GoHighLevel Communities lets you run a private group inside your own account instead of on Facebook. Setting one up takes about twenty minutes. The part that matters is what you decide before you start, because two of those choices are awkward to change once people have joined.
Short version
- Communities sits under Memberships, inside a sub account.
- Decide public or private, and free or paid, before you create it.
- Start with two or three channels. More just looks empty.
- Invited members are approved automatically, so only invite people you want in.
- You cannot permanently delete a community. You deactivate it instead.
This GoHighLevel Communities setup guide walks through creating the group, adding channels, every settings tab, inviting people, and how to remove a community when you no longer need it.
What Communities is, and what it is not
Communities is a group space built into GoHighLevel. Members log in, read posts in channels, comment, and see each other. If you have ever run a Facebook group, it is the same shape.
People move off Facebook for control. Your members sit in your account rather than on a platform that decides what they see, you can charge for access, and everything lives beside your funnels and emails.
What it is not is a full course platform. There is a Learning tab, but if selling courses is your main business, a dedicated platform does that job better. Communities works best when the group is the product, or when the group sits alongside something else you sell.
Communities lives under Memberships in a sub account. It does not appear in the agency view, which is the first thing to check if you cannot find it.
Three decisions to make first
Five minutes here saves a rebuild later.
Public or private? A public group lets anyone see posts and members. A private group shows nothing until someone joins. Most client communities should be private. You can change this later, but members notice when a space they thought was private becomes public.
Free or paid? Free is right if the group supports something else you sell. Paid is right if the group is the product. Switching a free group to paid after people have joined is a conversation nobody enjoys, so decide now.
One community or several? One group with channels is almost always better than several groups. A quiet group looks dead, and three quiet groups look worse than one busy one. Split into separate communities only when the audiences genuinely do not overlap.
Create your community
Make sure you are on one of your sub accounts before you start.
- From the left side navigation bar, click Memberships, then click Communities.
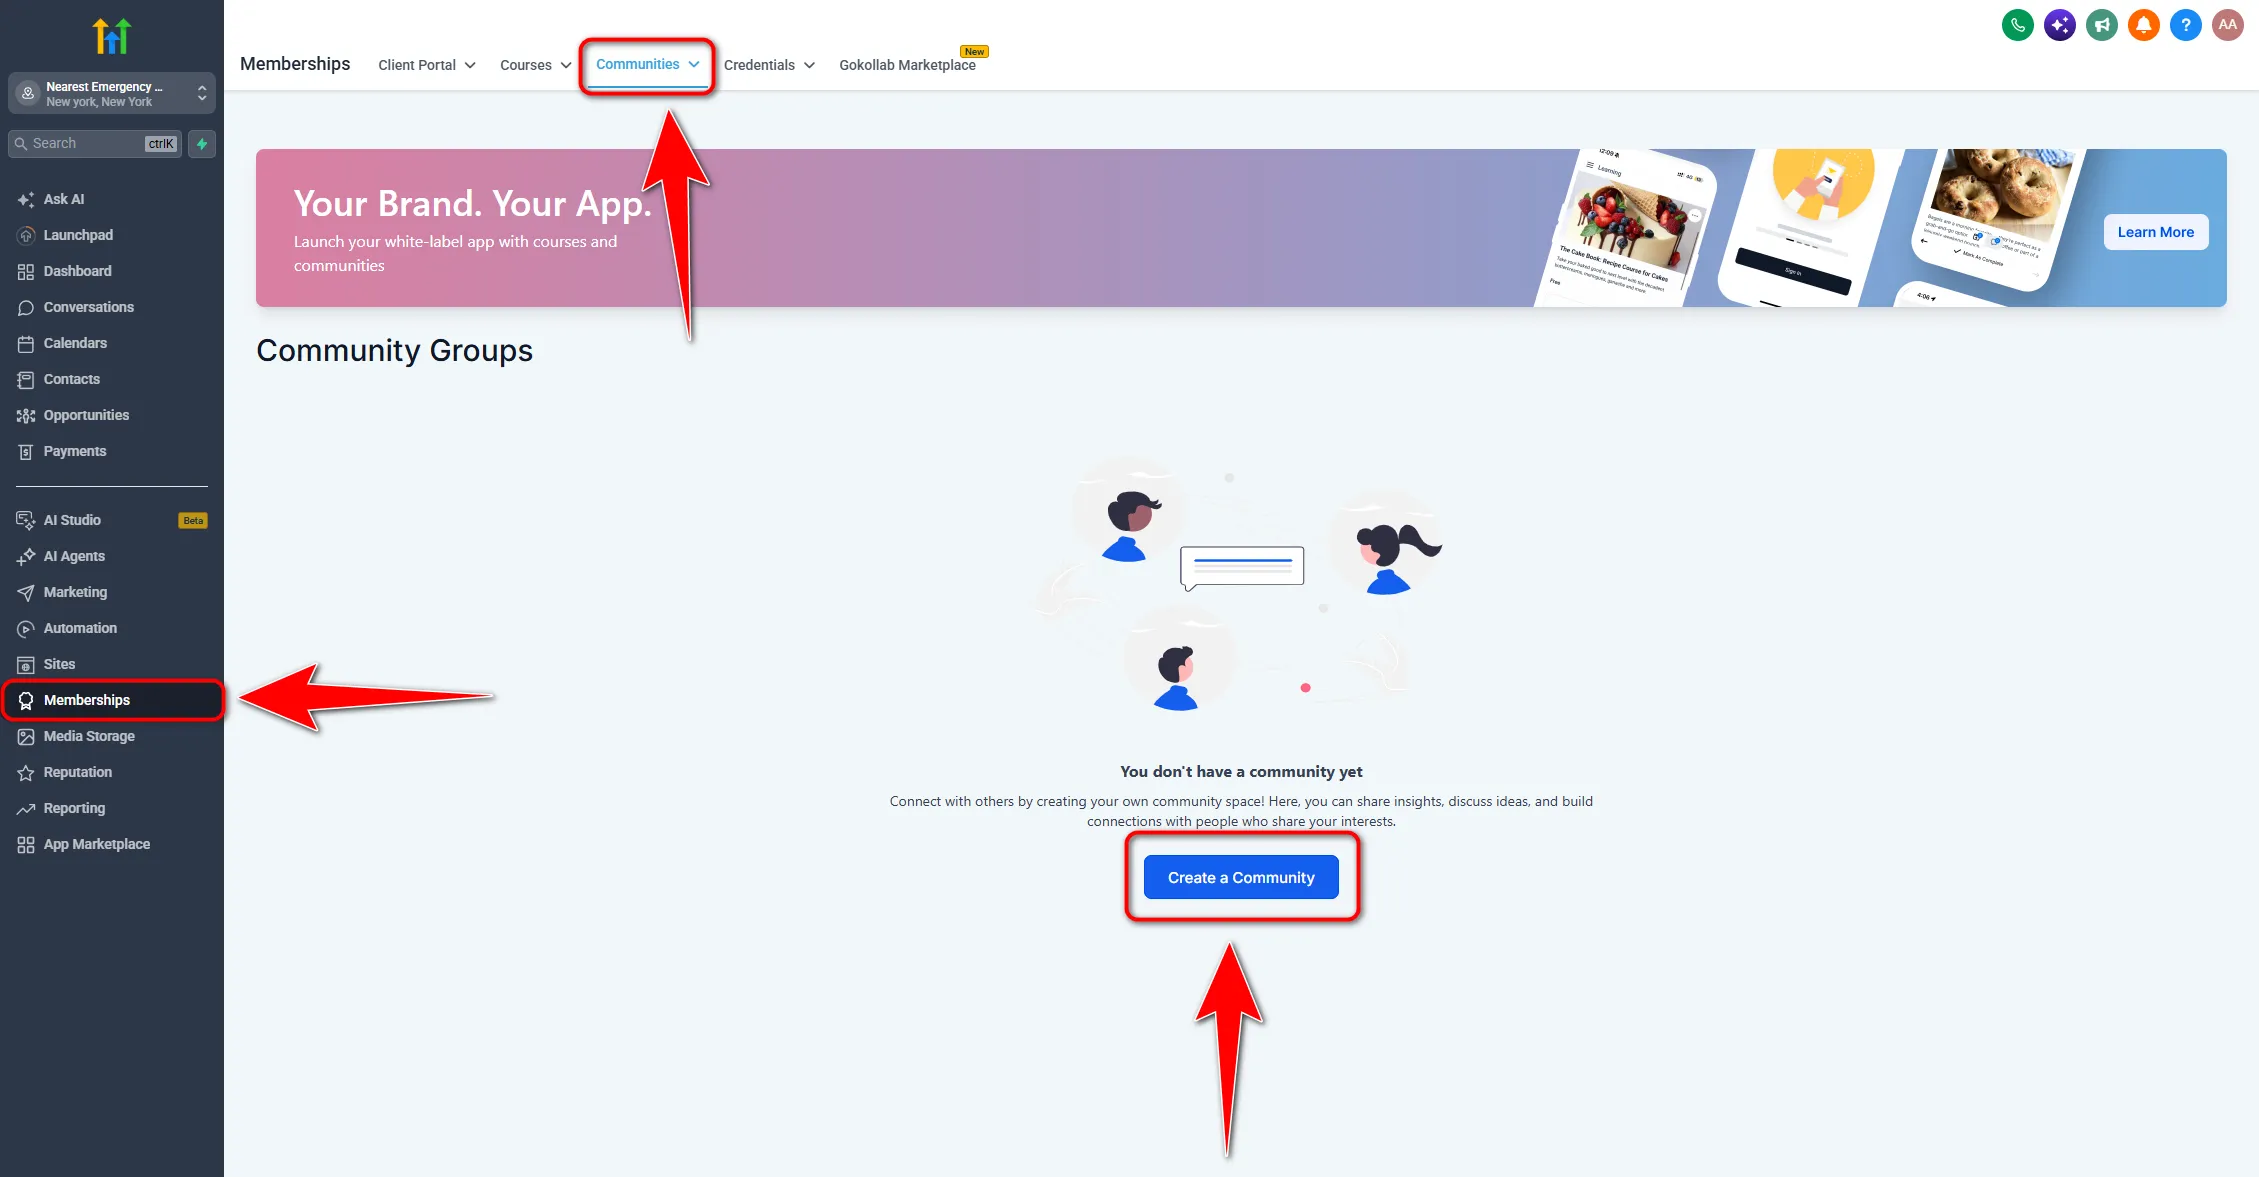
- Open the groups list, then click Create a Community to start a new community.
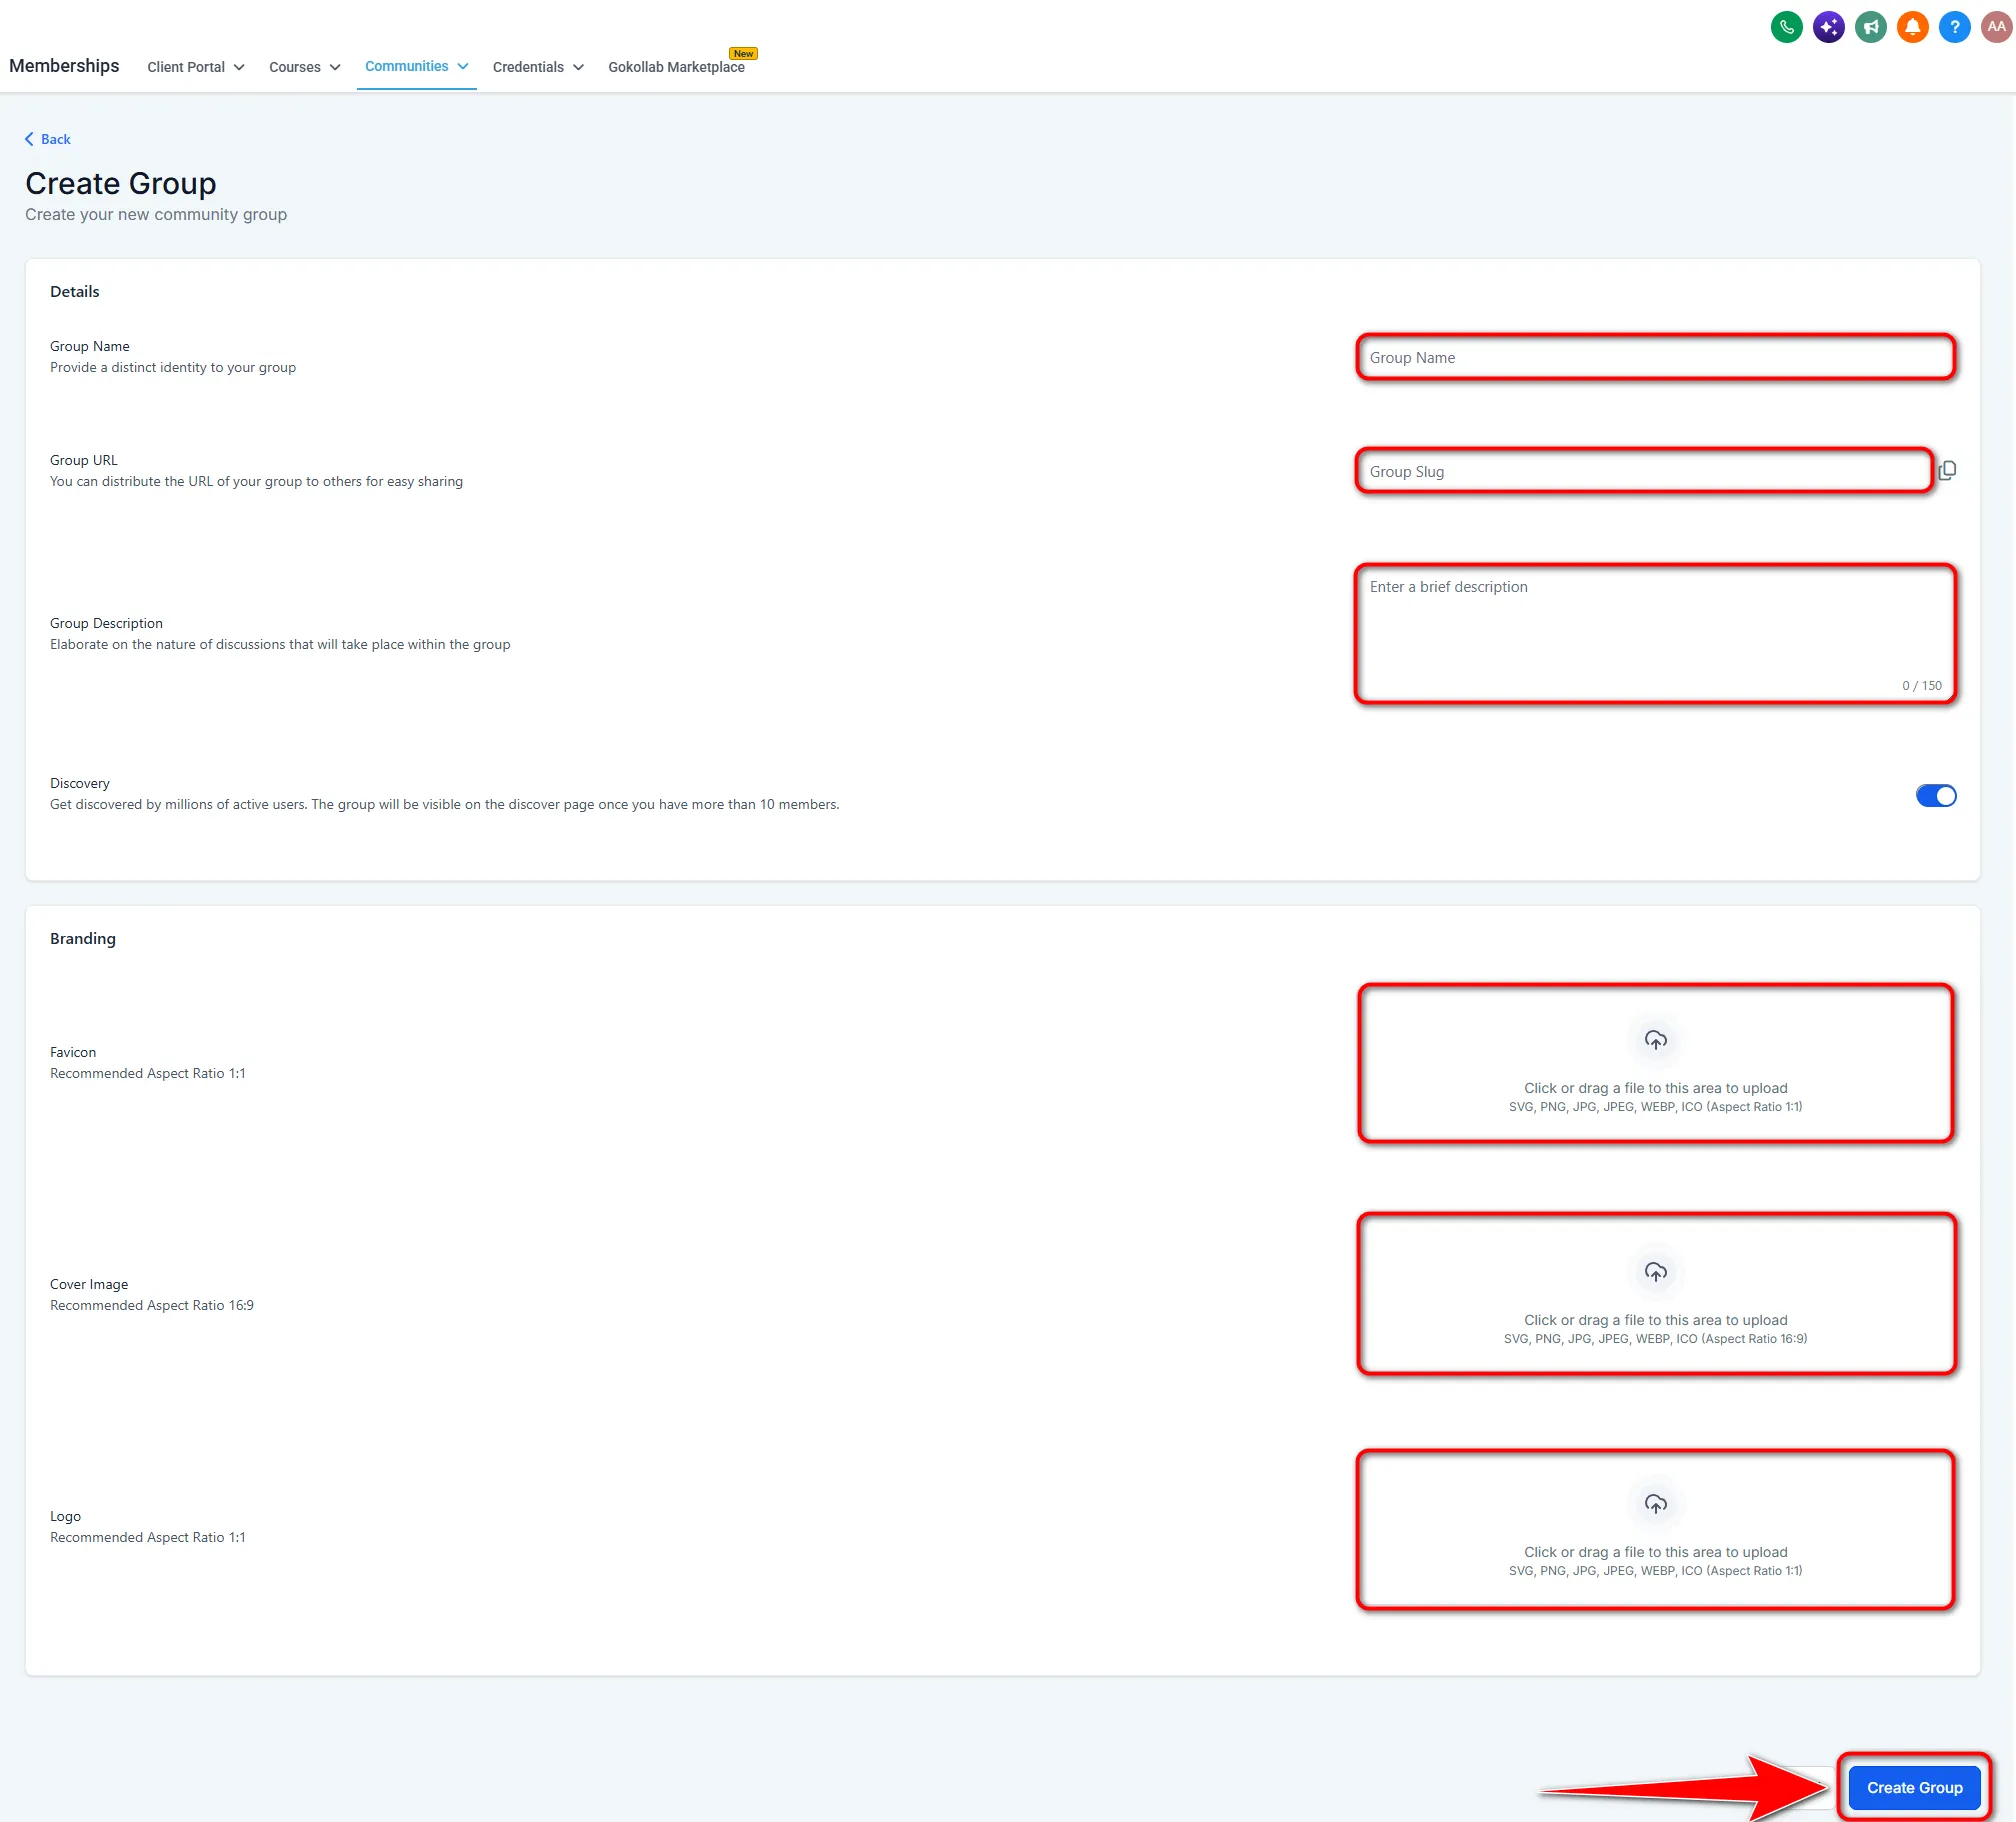
- Click the Group Name field and type a name. For example, type GoHighLevel Community. Name it for the members rather than for your own filing, since this is what they see at the top of the page.
- Review Group URL, also shown as Group Slug, which fills in from the name. Edit the slug if you want a cleaner link, then use Copy if you need the link later. Shorter is better, because you will be pasting this into emails and messages.
- Click the Group Description field and type a short description of what the group is for. For example, type A private space for Bright Future Real Estate clients to ask questions, share wins, and get market updates from Sarah. Say who it is for and what they get, because this is often the only thing someone reads before joining.
- Under Discovery, turn the toggle on if you want the group eligible for the discover page once it has enough members, or leave it off if you prefer it not listed that way. Leave it off for a client group.
- Optional: under Branding, add a Favicon, Cover Image and Logo if you have those files ready. You can add them later, so do not stop here hunting for artwork.
- Click Create Group. The new community opens right away, and there is no separate draft or active step on this path, so it exists from this moment.
You now have an empty community. Next it needs somewhere for people to post.
Free 30 day trial + 2 months free on annual

No account yet? Start a free trial and build your first community before you pay anything.
- Free trial
- 30 days
- Annual saving
- 2 months free
- In the trial
- Full access to your plan
Add your channels
Channels are the rooms inside your community. Start with two or three. A long list of empty channels makes a new group feel abandoned, and you can always add more once people are talking.
For most client groups, three works well. One for announcements, set to read only so it stays clean. One general discussion channel. And one for questions, which is usually where the real activity happens.
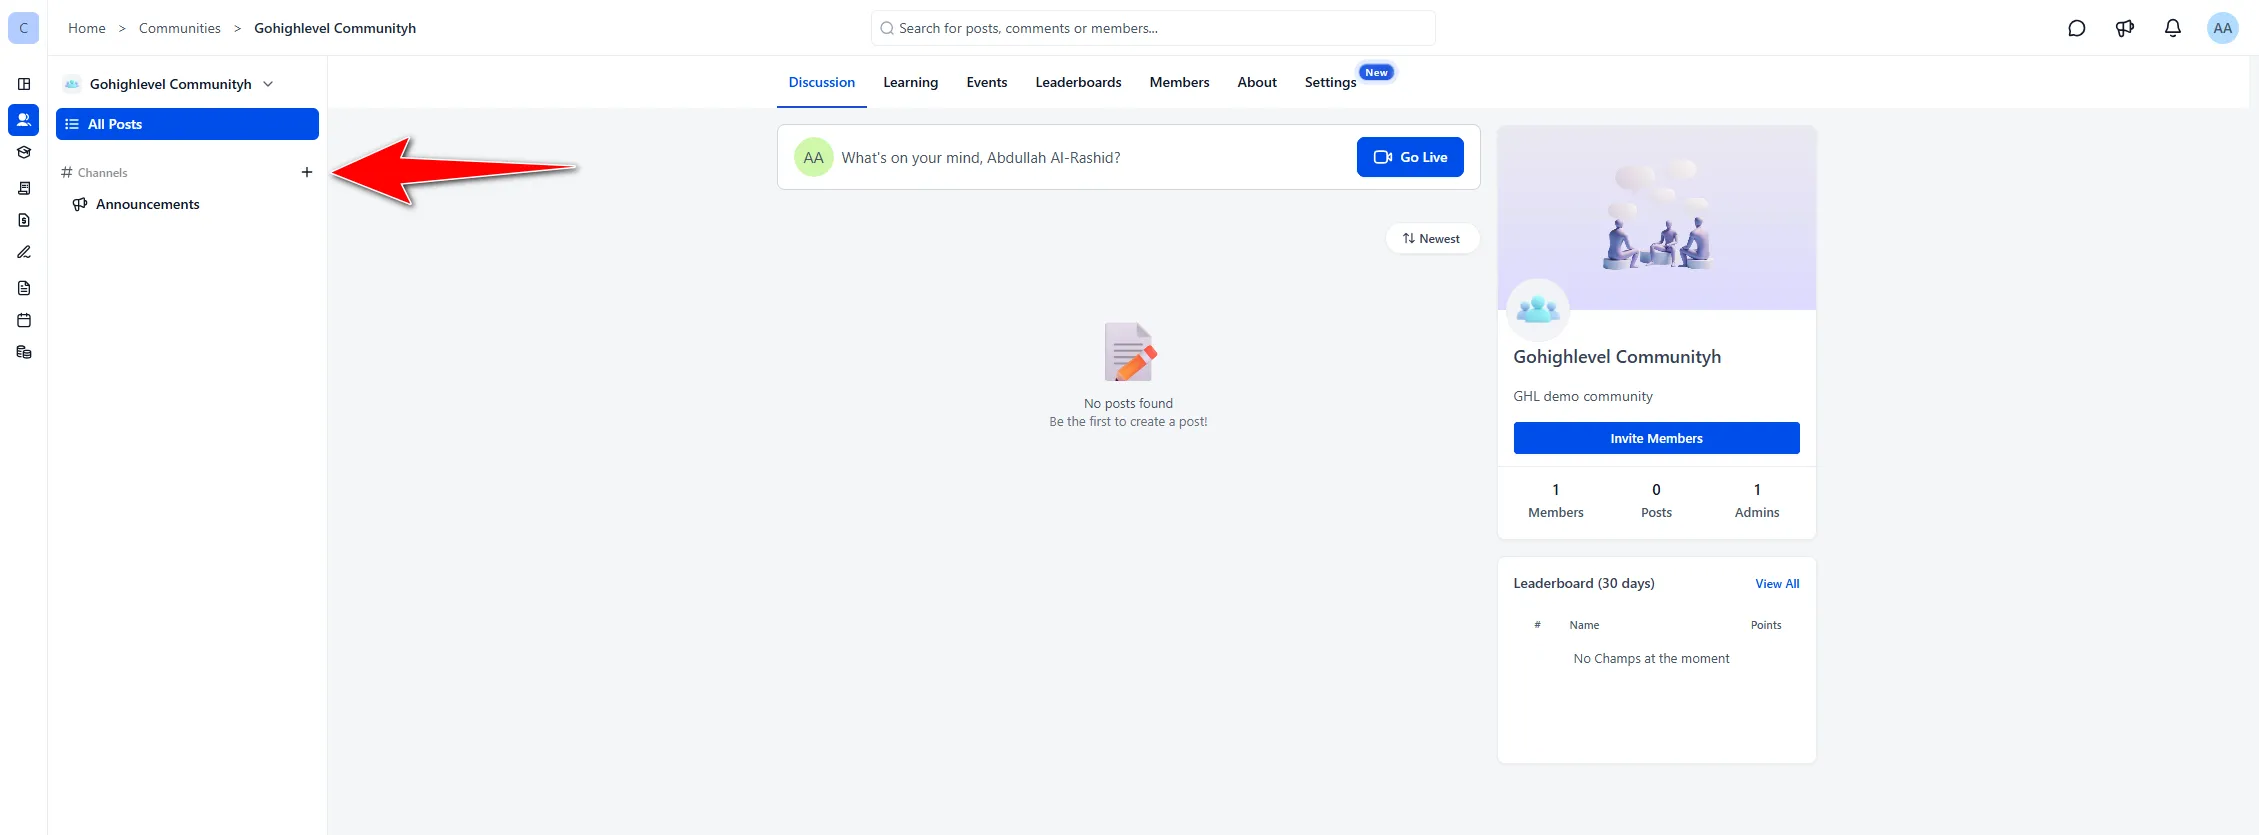
- On the community home, which is the Discussion page, find Channels and click +. A Create Channel popup appears.
- Choose Channel for conversations and updates, or Section if you only want a folder to organise channels. Pick Channel unless you already have enough channels to need grouping.
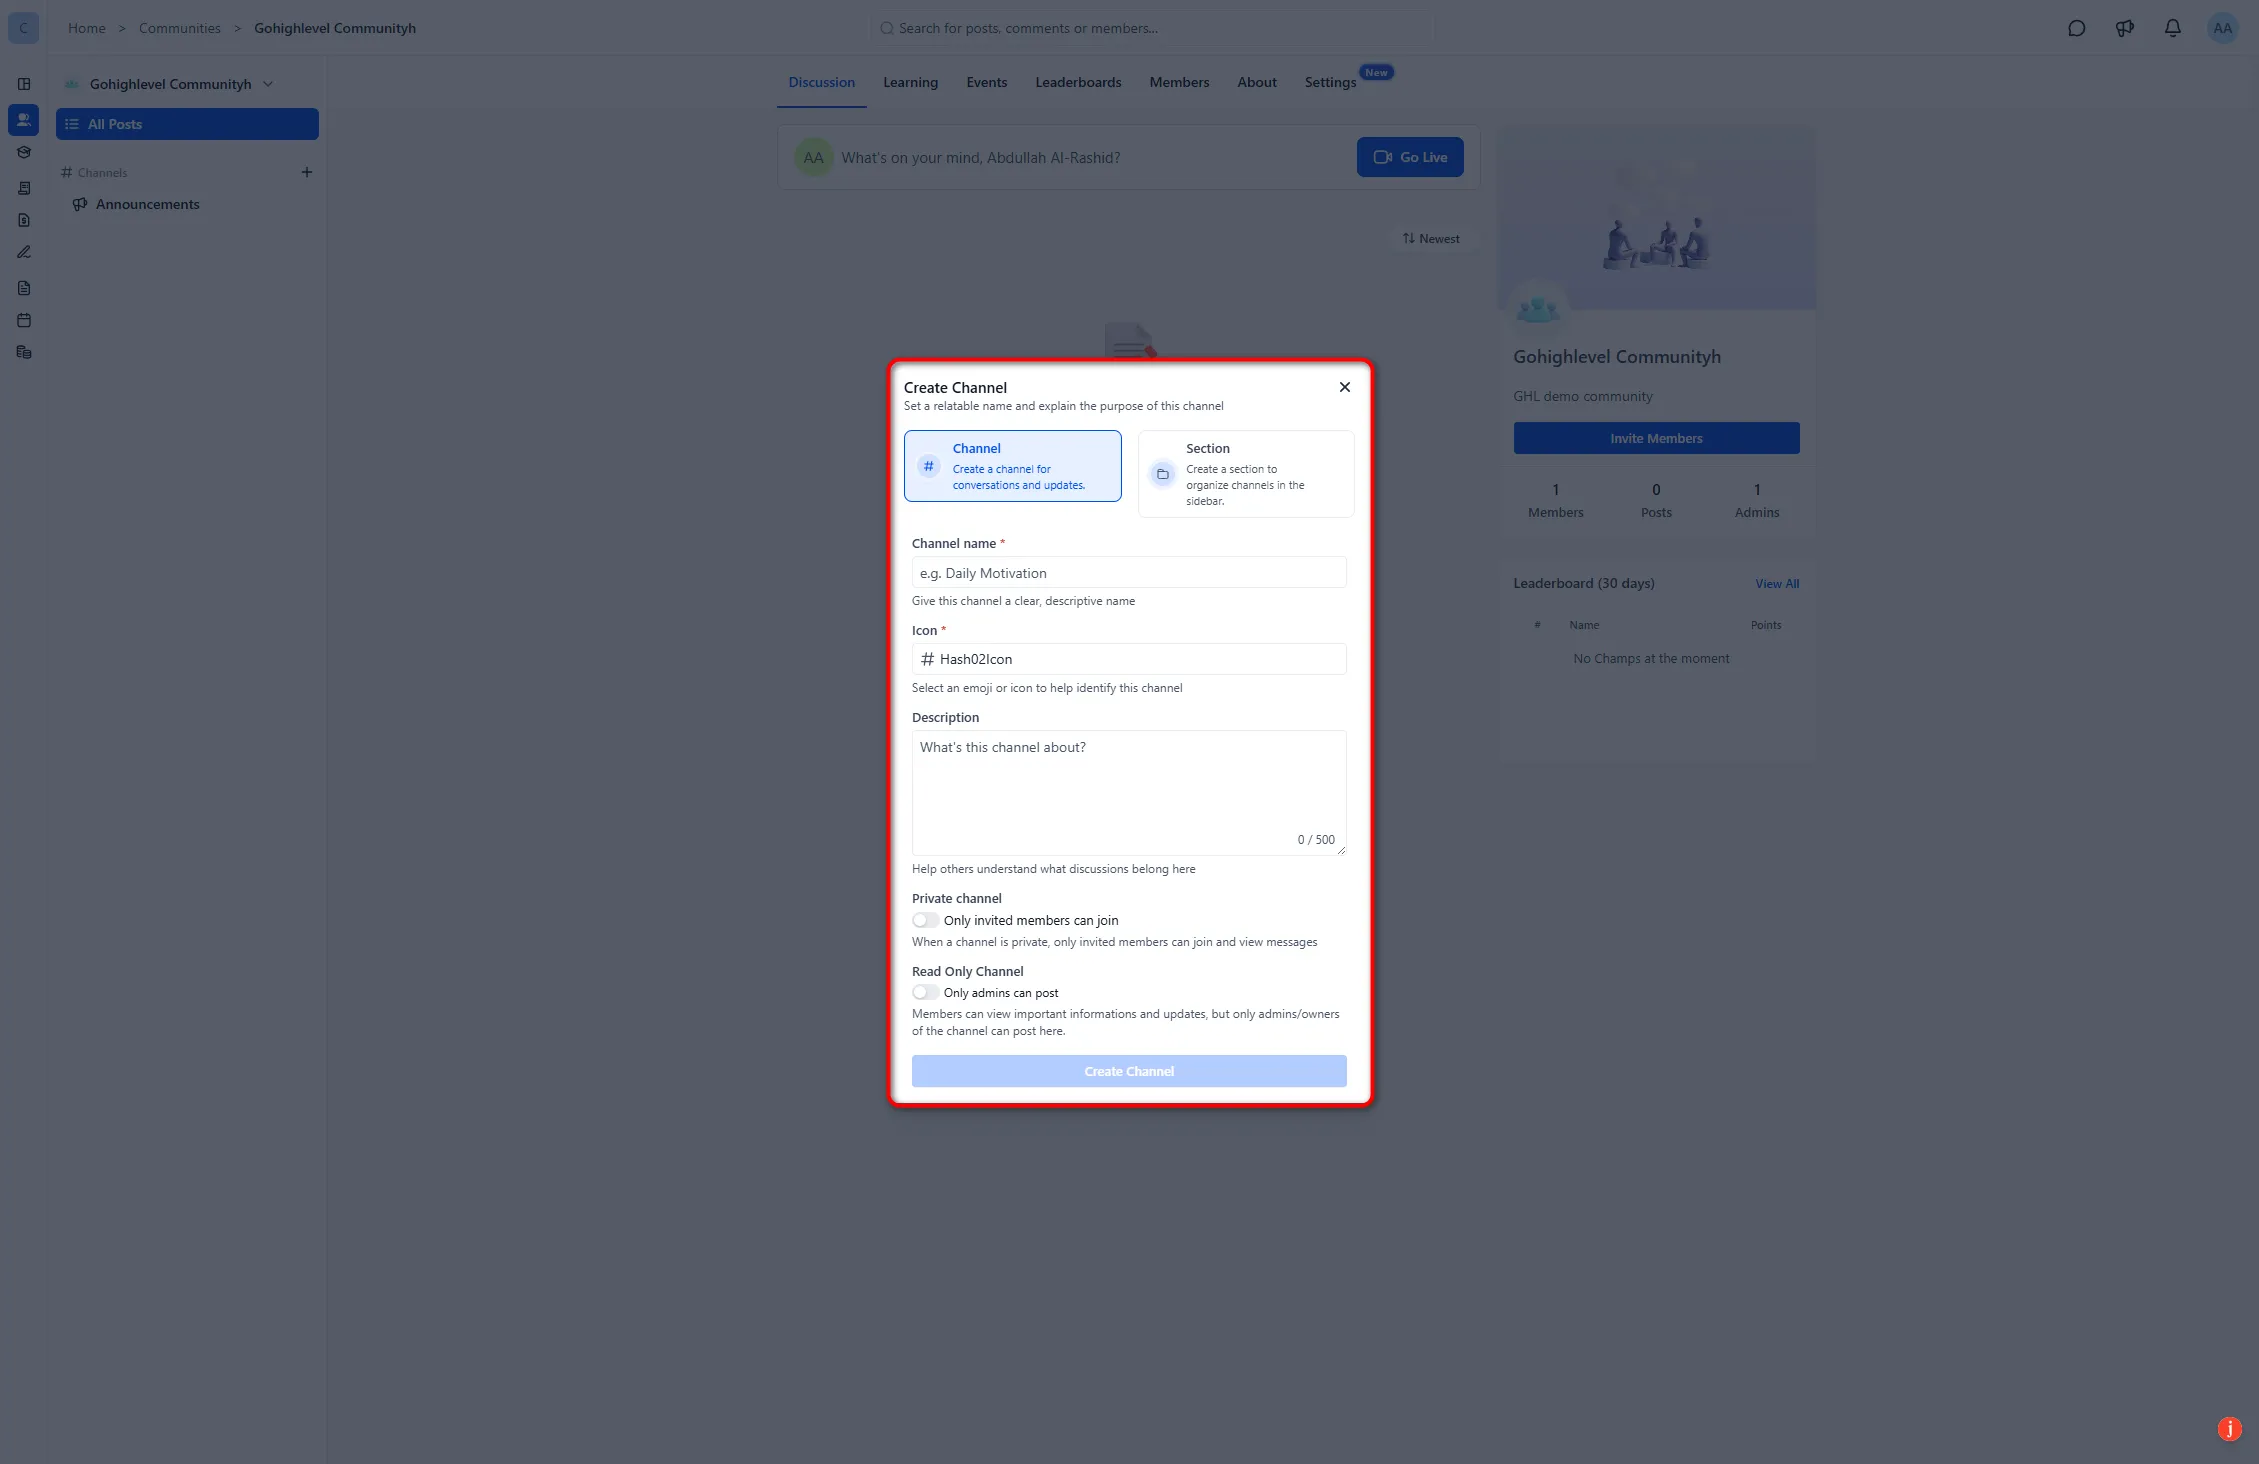
- Click the Channel name field and type a name. For example, type Buyer Questions.
- Click Icon and pick an emoji or icon. This is not decoration. Icons make channels easier to find at a glance, especially on a phone.
- Optional: click Description and type what belongs in this channel. For example, type Ask Sarah anything about buying a home with Bright Future. A one line description cuts down on posts landing in the wrong place.
- Optional: turn on Private channel if only invited members should join and see messages.
- Optional: turn on Read Only Channel if only admins should post. This is the setting for an announcements channel.
- Click Create Channel.
Repeat for each channel you need, then stop. Two or three is enough to launch with.
Configure your community settings
There are twelve settings areas. You do not need all of them on day one, and each step below says whether it can wait.
- Click Settings, then click Details to edit Group Name, Group URL and Description. Choose Public Group, where anyone can see posts and members, or Private Group, where only members can. Set Accessible from switcher, Allow members to invite new members and Show mandatory profile modal as needed, then click Save changes. Do this one first, because the public or private choice shapes everything else.
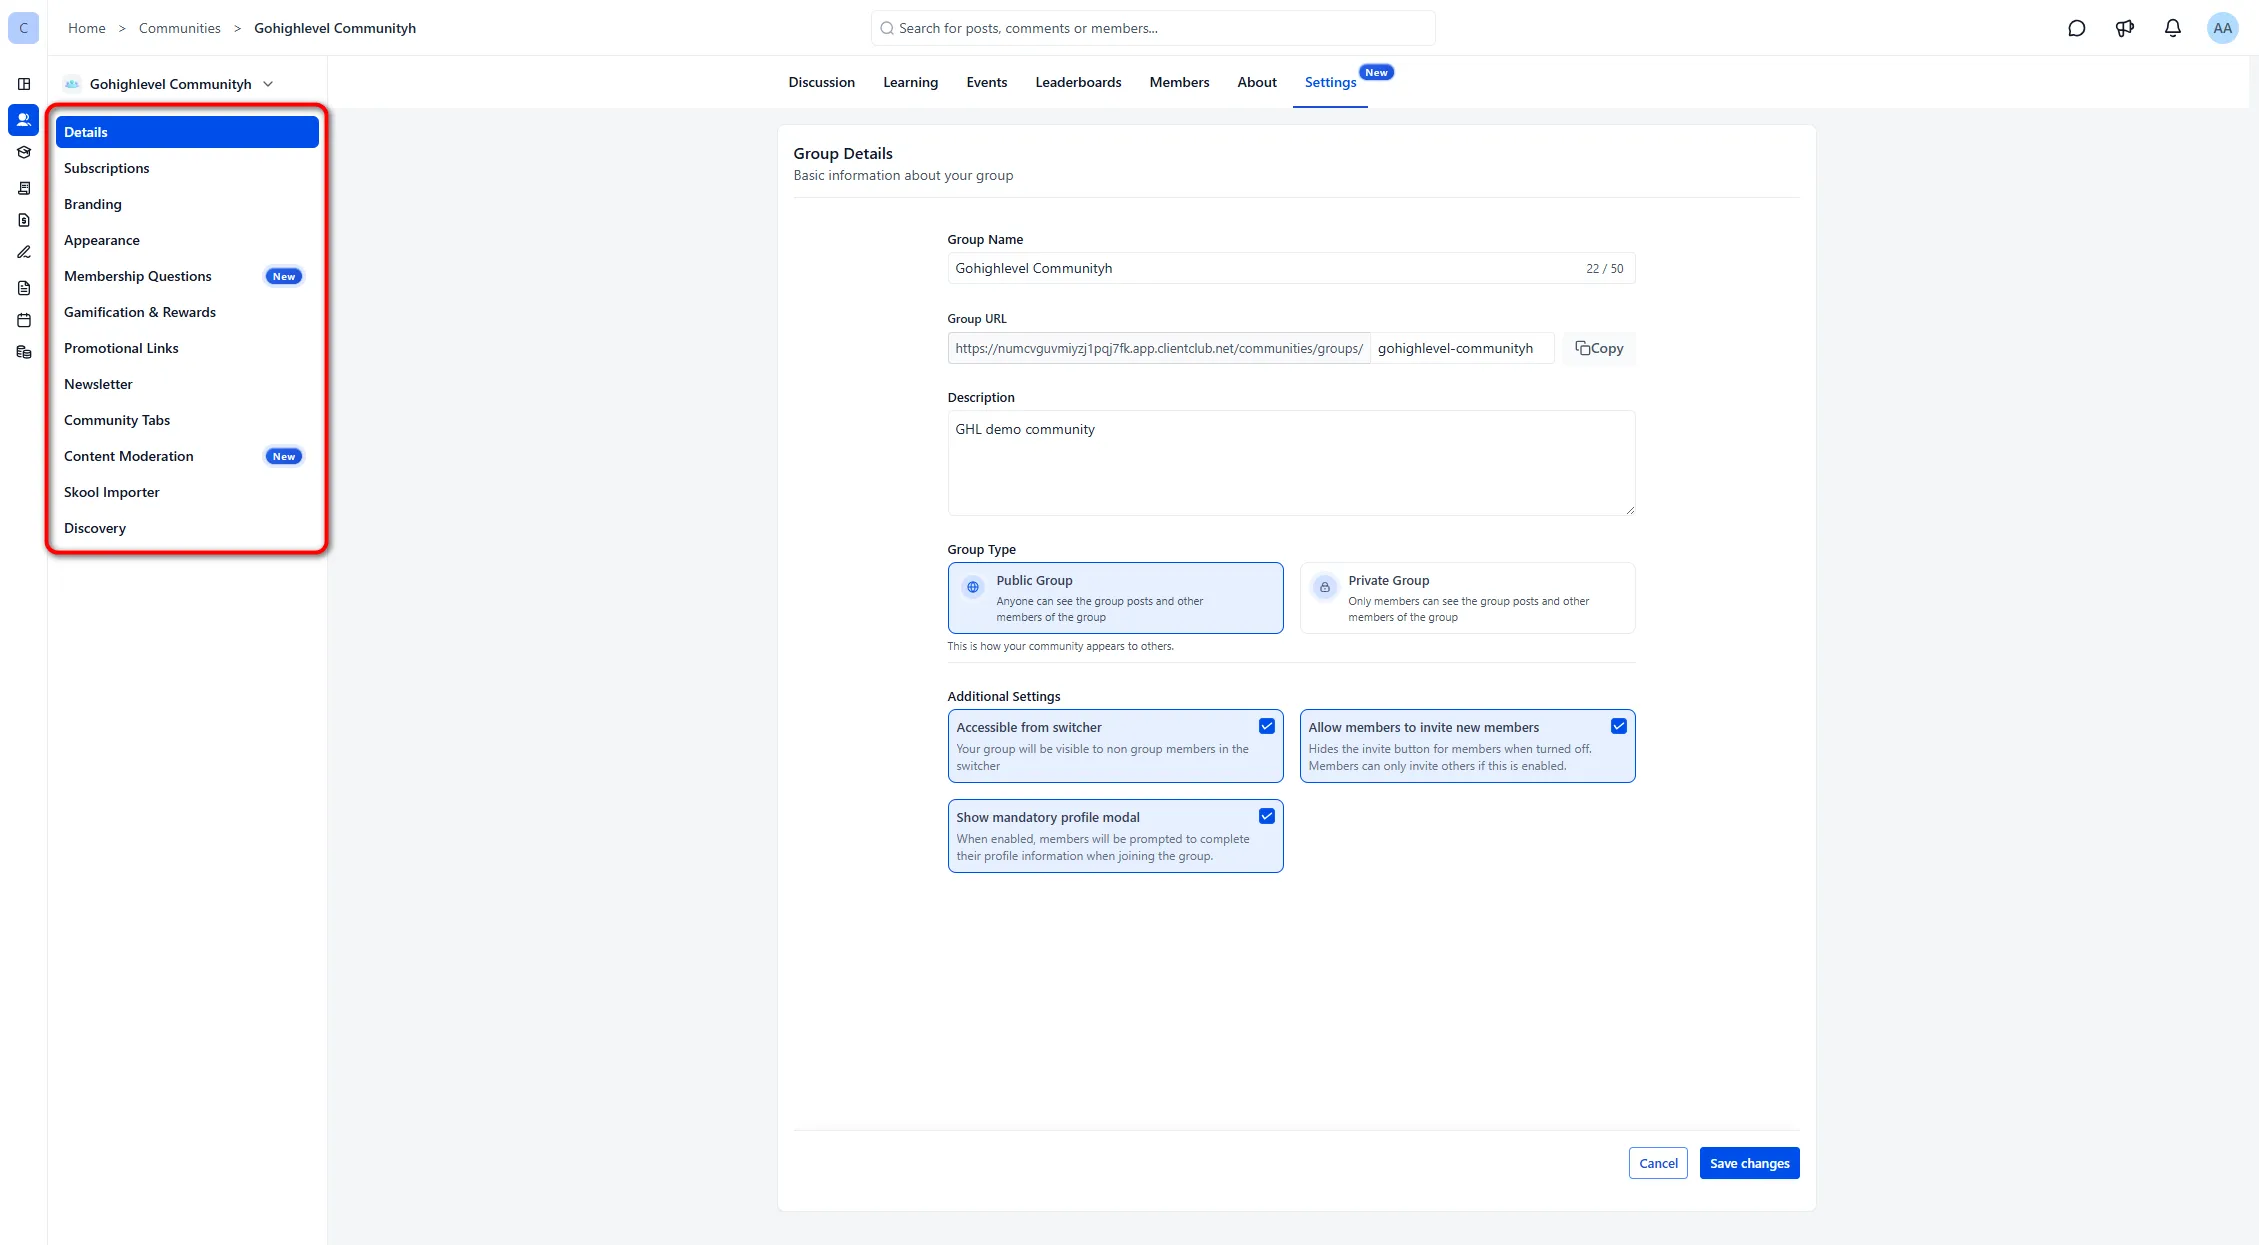
- Click Subscriptions to set Free or Paid access, price, trial days, payment type and billing period when you sell community access. Skip this entirely if the group is free.
- Click Branding to update Logo, Favicon, Cover Image and any Advanced branding options. Worth doing before launch, since default branding makes a community look unfinished.
- Click Appearance and pick a theme, for example Default, Royal Velvet, Lush Meadow, Zesty Citrus, Sunny Delight, Azure Dreams, Bubblegum Bliss, Ivory Whisper or Midnight Deep, or click Customise to build your own. Pick something close to your brand colours and move on, because this is easy to change and easy to lose an hour in.
- Click Membership Questions to turn on join questions, up to five, choose Short text, Single select or Multi select, and map answers to CRM custom fields if you use them. The CRM mapping is the useful part, because answers land on the contact record rather than sitting in the community. Can wait until you know what you want to ask.
- Click Gamification & Rewards to set Levels and use Add Reward if you want points or rewards. Leave this until the group is active, since rewarding points in a quiet group only highlights how quiet it is.
- Click Promotional Links and use Add Link for links you want members to see. Add these once you have something to promote.
- Click Newsletter to Activate Newsletter and set frequency, time and timezone if you want community email digests. Turn this on after the group is active, because a digest of nothing is worse than no digest at all.
- Click Community Tabs and turn visibility on or off for Discussion, Learning, Events, Leaderboards, Members and About. Do this before launch and turn off anything you are not using, because an empty Events tab tells a new member the group is not really running.
- Click Content Moderation to add keywords, review held content, handle reports, or use the starter pack options. A private client group rarely needs this on day one. A public group does, so set it up before you open the doors.
- Optional: click Skool Importer only if you are importing from Skool. Enter the URL, email and password, then click Confirm.
- Click Discovery to control Show on Discovery, the community URL, category and refresh options. Only relevant if you want your group listed publicly.
Community Tabs is the setting people skip and regret. A new member clicking into an empty Learning tab or an empty Leaderboard learns that the group is not really running. Hide them until you have something to put there.
Invite your first members
One thing to know before you start. Invited members are approved automatically. There is no queue to review, so only send invitations to people you actually want in the group.
- Click Members, then click Invite Members. You can also reach this from the community side card. A popup appears.
- Use Share Group Link and click Copy to share the join link, or under Invite via Email fill in Name and Email. For example, Sarah and [email protected].
- Optional: turn on Give Administrative Privileges if this person should manage settings, members and content. Be careful with this one, since an admin can change everything you just set up.
- Click Send Invite when you are ready to send. Remember that invited members are auto approved.
Invite a small first group rather than everyone at once. Ten people who will post beats a hundred who will not.
Partner offerFree 30 day trial+ 2 months free on annual
- 30 days instead of the public 14
- Full access to the plan you choose
- Cancel any time before it ends
Card required. Nothing charged until the trial ends.
How to delete a community
Worth knowing before you create several communities to experiment with. Communities in GoHighLevel cannot be permanently deleted from the interface. You deactivate the group instead, which sets it to Inactive and removes it from use while keeping the record.
That is not necessarily a bad thing, since a deactivated group can be switched back on later. But it does mean test communities stay in your list, so name them clearly if you are only trying things out.
- From the left side navigation bar, click Memberships, then click Communities.
- Open the groups list, for example Groups, then find the community you want to remove. For example, find BF Community Demo - Sarah.
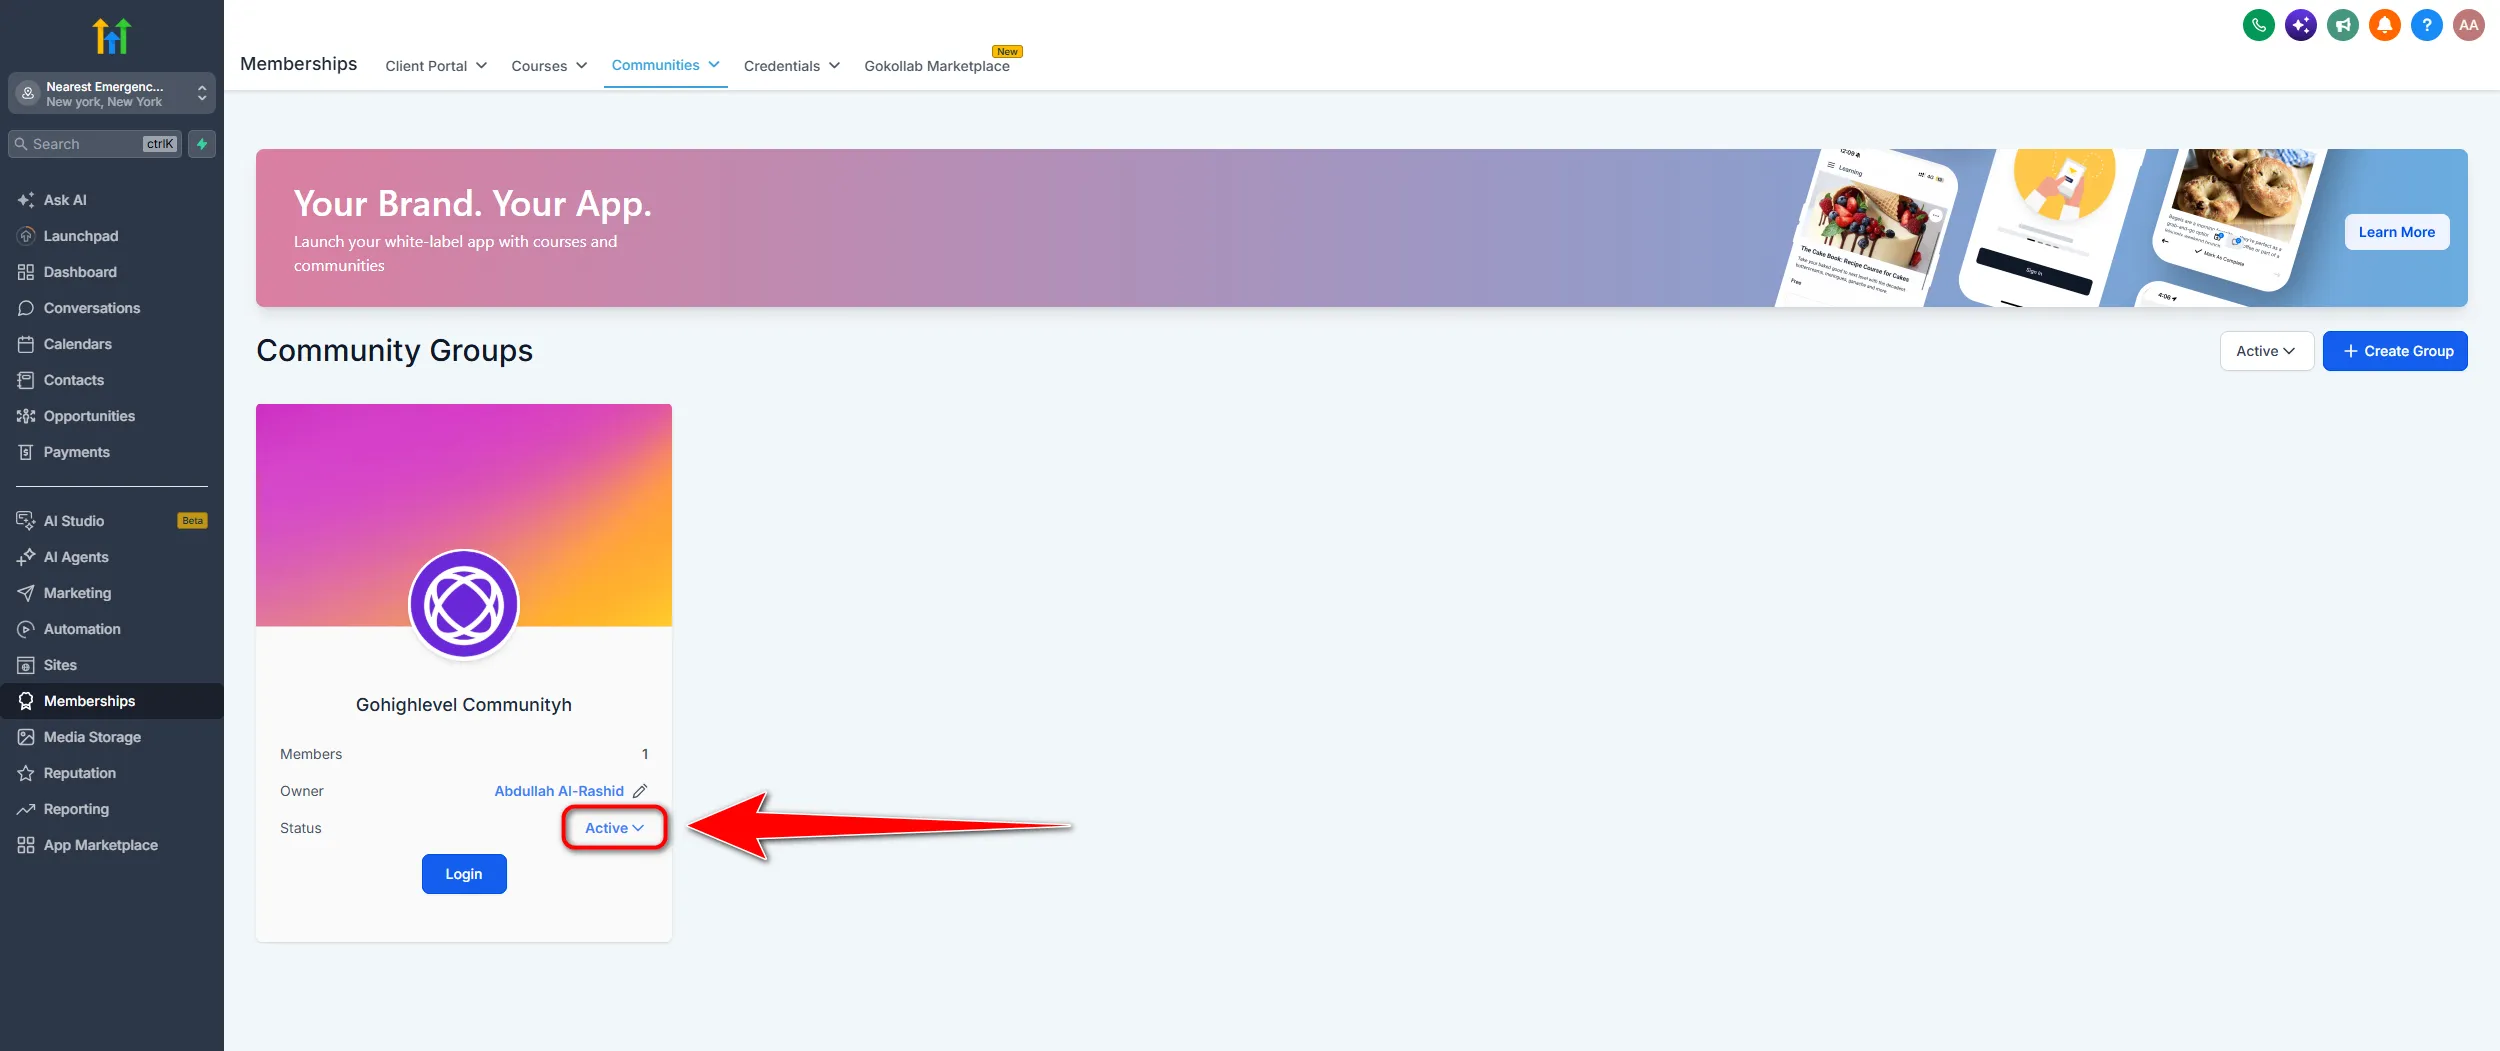
- Click the status Active on that community.
- Click Inactive. A Deactivate Group confirmation appears asking if you are sure you want to deactivate this group.
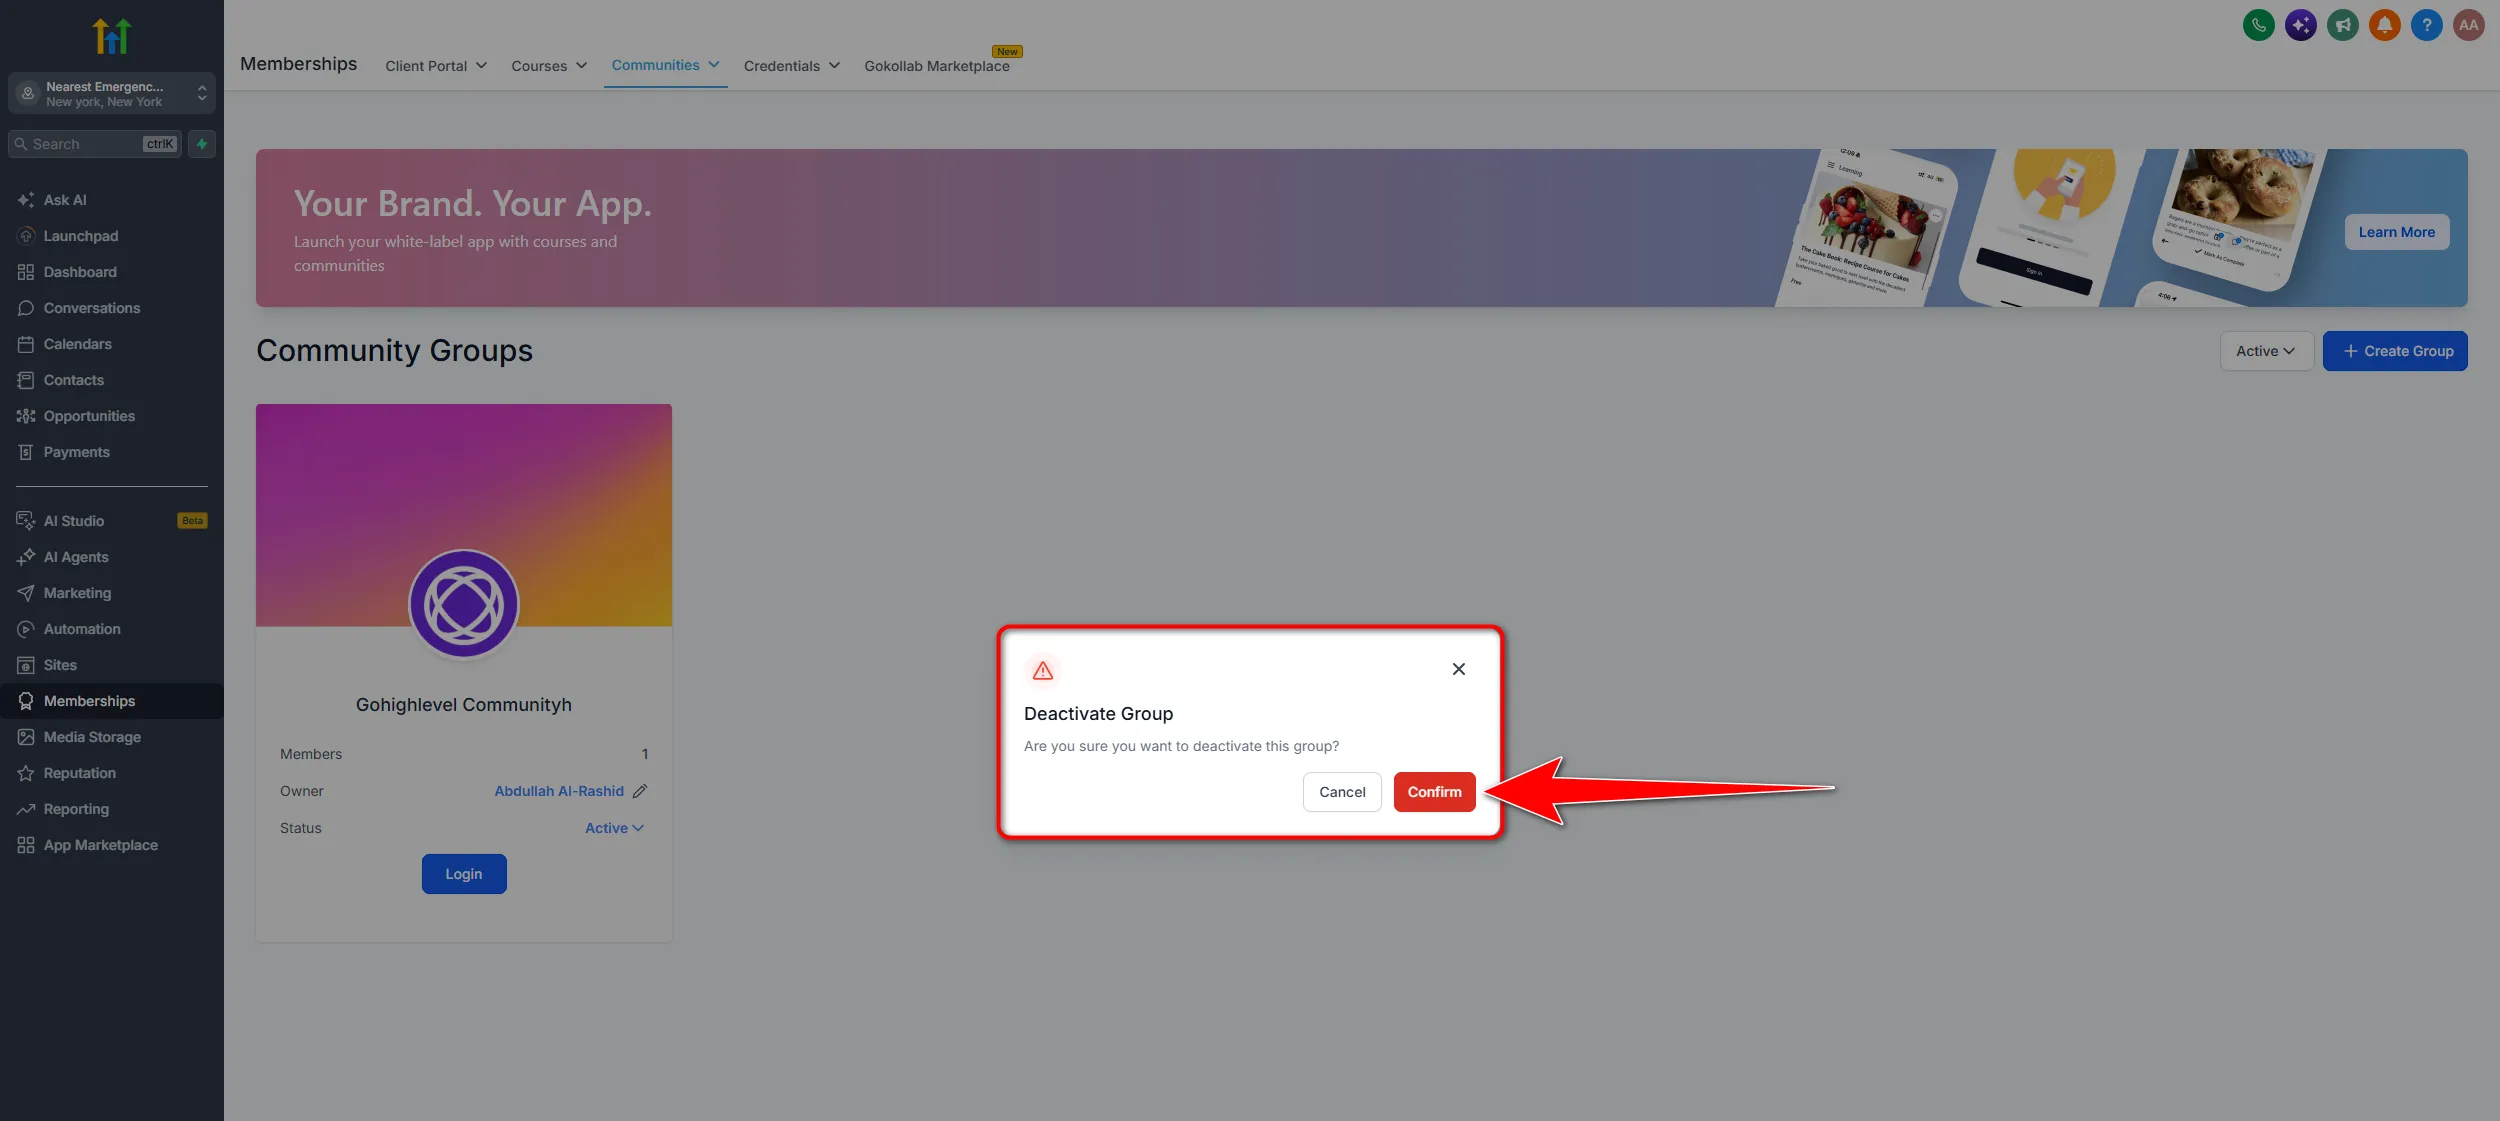
- Click Confirm, or click Cancel if you change your mind. Wait for the success message saying the group is deactivated, after which the list shows that community as Inactive.
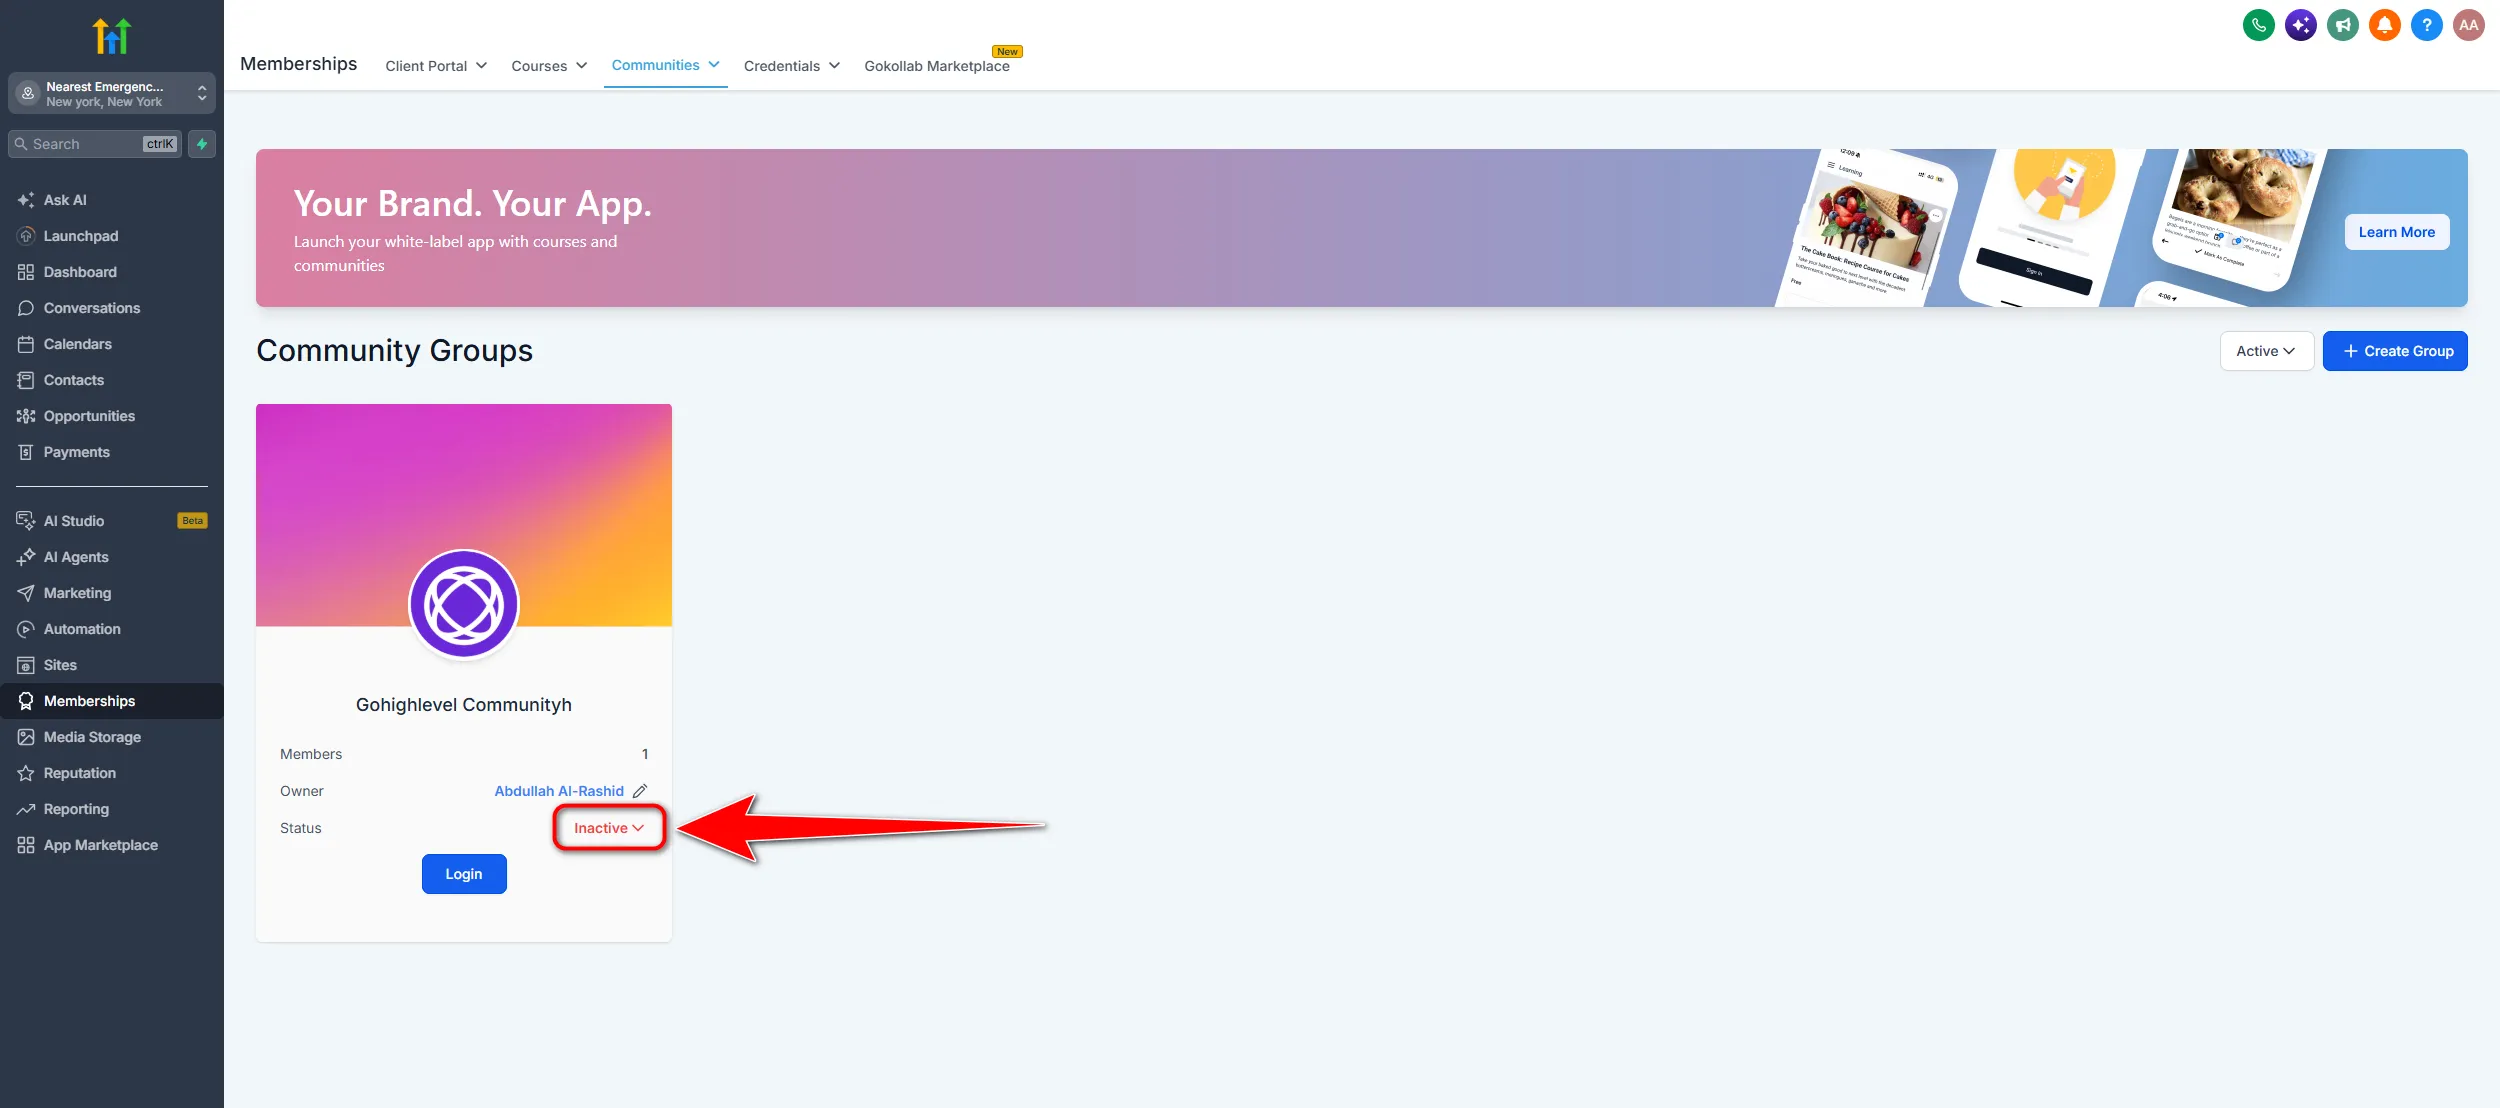
- Optional: to bring it back later, click Inactive on that community, then click Active.
Deactivating removes access for everyone in the group. If people are paying for it, sort out their subscriptions before you switch it off rather than after.
A launch checklist
Do these before you send the first invitation.
- Post a welcome message. An empty community is where new members leave. Write a post explaining what the group is for and what you want people to do first.
- Write the rules. Two or three lines is enough. Put them in your announcements channel.
- Seed each channel. Put one real post in every channel so nobody has to go first into an empty room.
- Ask a question. The fastest way to get replies is to post something people can answer in one line.
- Check it on a phone. Most members will open it on a phone, and it is worth seeing what they see.
- Test the join link. Open it in a private window and go through what a new member goes through.
Who this suits, and who should look elsewhere
An honest read, because Communities is not the strongest group tool available.
It suits you if you already run your business on GoHighLevel, the group supports something else you sell, and you want members inside your own system rather than on Facebook. If you are an agency offering a community to clients as part of a package, it is a clear win, because it costs nothing extra and it lives where everything else does. Our breakdown of GoHighLevel plans shows what else each tier includes.
Look elsewhere if the community is your whole business. Platforms built purely for communities do it better. Mighty Networks has a stronger member experience and a proper mobile app. Kajabi's community sits next to a much better course platform if courses are the main thing you sell. Circle and Skool are both more polished as standalone products.
The honest summary is that Communities is a good feature inside a platform you are already paying for, rather than a reason to choose the platform. Our GoHighLevel review covers where the platform as a whole is strong and where it is not.
Common questions
Where is Communities in GoHighLevel?
Under Memberships in a sub account. Click Memberships in the left side navigation, then Communities. It does not appear in the agency view.
Can I delete a community in GoHighLevel?
Not permanently, at least not from the interface. You set the group to Inactive instead, which removes access while keeping the record. You can switch it back to Active later.
Can I charge for access to a community?
Yes. In Settings, open Subscriptions and set it to Paid, then add the price, trial days, payment type and billing period. Decide this before people join, because moving a free group to paid afterwards is awkward.
What is the difference between a channel and a section?
A channel is where people post. A section is a folder that groups channels together. You only need sections once you have enough channels to need organising.
Can I make a channel announcements only?
Yes. Turn on Read Only Channel when you create it, and only admins can post there.
Do I have to approve people who join?
Not if you invited them. Invited members are approved automatically, so only invite people you want in the group.
Can I move my group over from Skool?
Yes. There is a Skool Importer in Settings. You enter the Skool URL, email and password, then click Confirm.
How many channels should I start with?
Two or three. Announcements, general discussion, and questions covers most groups. Empty channels make a new community look dead.
Does Communities cost extra?
It is part of the platform rather than a separate add-on. Our pricing guide covers what each plan includes and what is charged on usage.
The verdict
Setting up a community takes about twenty minutes. Create the group, add two or three channels, work through the settings, and invite a small first group.
The decisions that matter come before any of that. Public or private, free or paid, and one community or several. Those three are the ones that are painful to change once members are in. It is also worth knowing that you cannot truly delete a community, only deactivate it, so do not create half a dozen while you are experimenting.
After launch, the work is not in the settings. It is in showing up and posting. A community with three channels and a host who replies beats one with twelve channels and silence.
Menu names and settings are set by GoHighLevel and change from time to time. The steps here were accurate at the time of writing. If a setting has moved, the order still holds.
Some links on this page are partner links. How that works is explained on our affiliate disclosure page.