Most people searching for a GoHighLevel Zapier integration hit the same wall first: there's no app called GoHighLevel in Zapier. The official app is called LeadConnector, and once you know that, connecting the two takes a few minutes. In this guide I cover what the app can and can't do, how I connect it, how I use webhooks to fill the gaps, what Zapier really costs, and the cases where I skip Zapier completely.
Short version
- In Zapier, GoHighLevel is called LeadConnector. It's HighLevel's official, white-labeled app.
- You connect with a login, not an API key, and each connection covers one sub-account.
- Zapier lists one trigger and five actions. There's no new contact or form trigger.
- For anything else, I send data out with a workflow Webhook action to a Zapier Catch Hook.
- Webhooks and multi-step Zaps need Zapier Professional, from $19.99 a month on annual billing.
- Often you don't need Zapier at all: workflows, native integrations and webhooks cover a lot.
The short answer
Yes, GoHighLevel works with Zapier. Search Zapier for LeadConnector, sign in with your GoHighLevel email and password, and pick the sub-account you want to connect. From there you can start a Zap when an opportunity moves to a new pipeline stage, and you can create or update contacts, opportunities and tasks, or add someone to a workflow, from any app Zapier supports.
The app is small, though. If you want a Zap to run when a new contact is created, a form is submitted or an appointment is booked, the Zapier app can't do that on its own. I handle those with a GoHighLevel workflow that sends the data to Zapier through a webhook. And before you build anything, it's worth checking whether you need Zapier at all, because a lot of what people use it for can be done inside GoHighLevel.
What the LeadConnector Zapier app can do
Zapier's LeadConnector integrations page lists one trigger and five actions. Here's what each one does and how I use it.
| Type | Name | What it does | How I use it |
|---|---|---|---|
| Trigger | Pipeline Stage Changed | Starts a Zap when an opportunity moves to a new stage. You can filter by pipeline and stage. | Send won deals to a spreadsheet, an invoicing tool or a Slack channel |
| Action | Add/Update Contact | Creates a contact, or updates it if it already exists | Push leads from a form tool, a booking app or another CRM |
| Action | Add/Update Opportunity | Creates or updates a deal in a pipeline | Open a deal when a lead comes in from outside |
| Action | Add Lead to Workflow | Enrolls a contact in a workflow | Start a nurture or onboarding sequence from another app |
| Action | Stop All Workflows for Lead | Removes a contact from every active workflow | Stop follow-up when someone buys or books elsewhere |
| Action | Add Task | Creates a task on a contact | Remind the team to call a new lead |
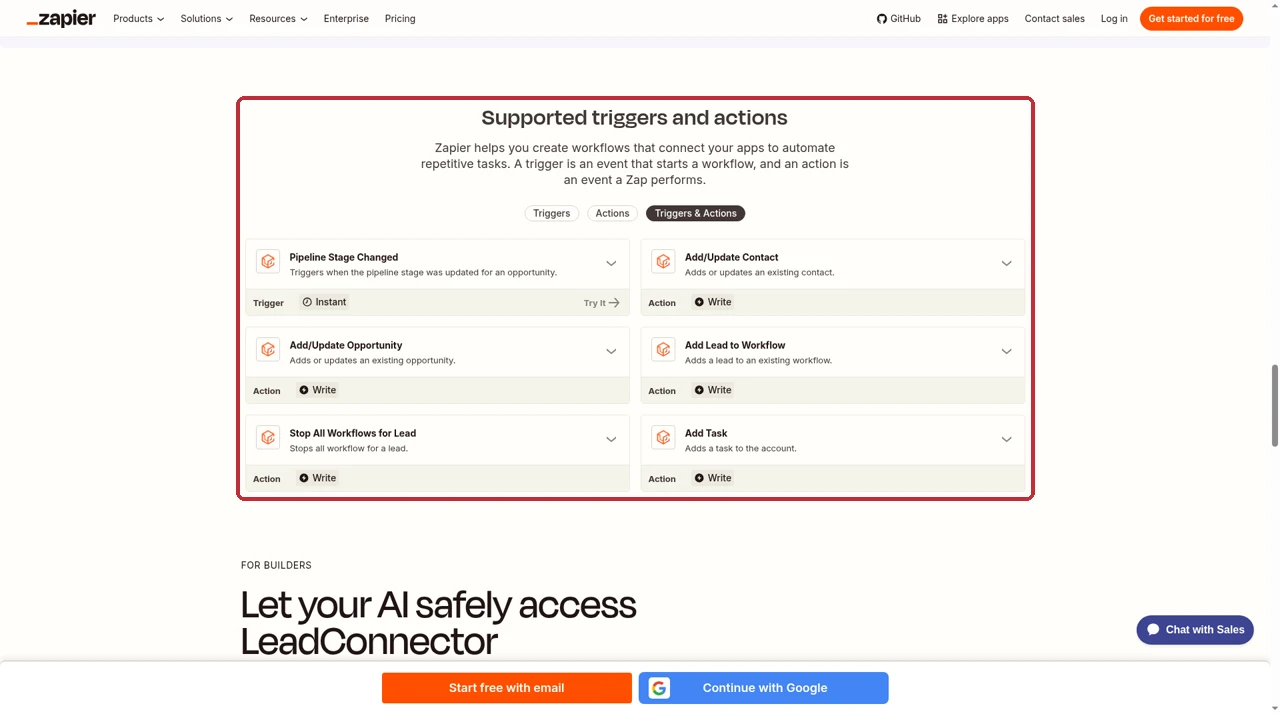
What's missing matters as much as what's there. I didn't see a trigger for a new contact, a form or survey submission, a booked appointment, a payment or an inbound message. If one of those is what you need, the webhook method below is the way I do it.
How authentication works
HighLevel moved its Zapier authorization to OAuth, which replaced the old method of pasting an API key. When you connect, you see a LeadConnector login screen. You sign in with the same email and password you use for your CRM, then choose the sub-account. There's no key to copy.
Each connection is tied to one sub-account. If you run an agency with ten clients, you make ten connections in Zapier, one per sub-account, and you pick the right one in every Zap. Naming them clearly saves a lot of confusion later.
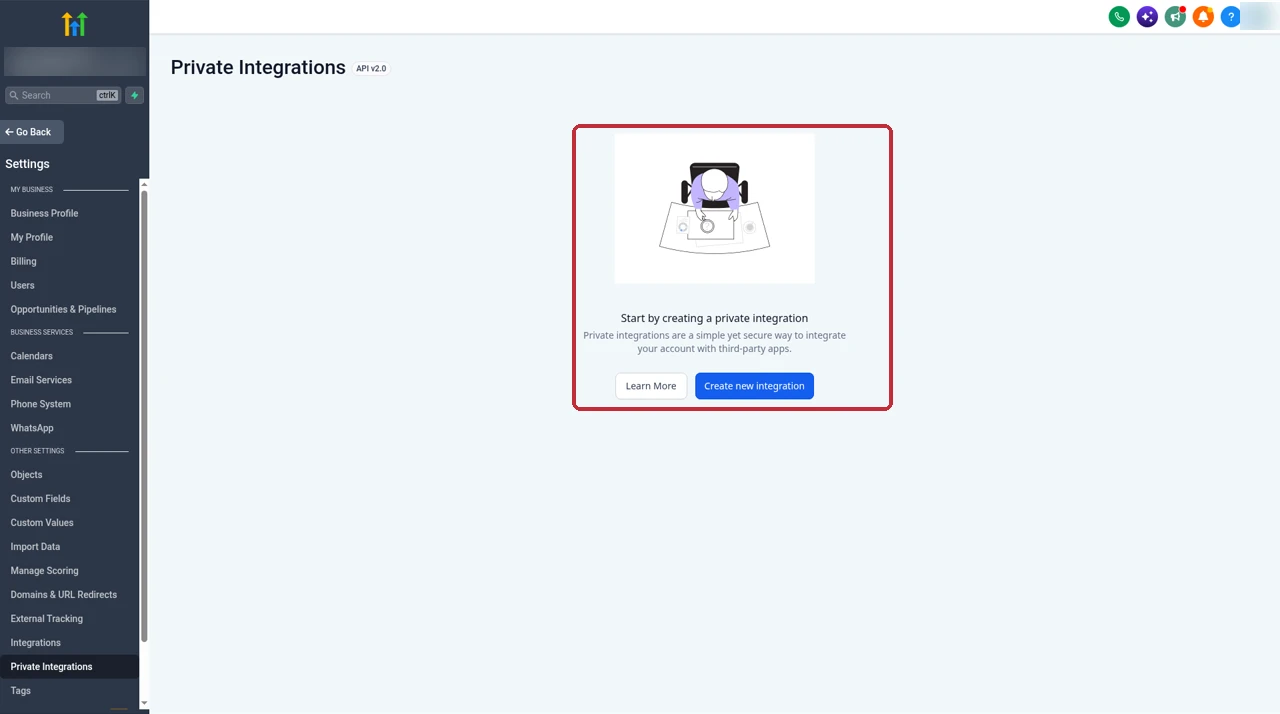
API keys matter only if you go around the Zapier app. HighLevel's legacy v1 API keys are end-of-life: you can't create new ones, and keys that sit unused may expire after 90 days. For direct API calls, HighLevel now uses Private Integrations. You create a token in the sub-account settings, choose exactly which scopes it gets, and use it as a Bearer token with API v2. The token is shown only once, so copy it somewhere safe, and I make one per tool so I can revoke a single connection without breaking the others.
Free 30 day trial + 2 months free on annual

Build your automations inside GoHighLevel Workflows, webhooks and native integrations come with every plan, so you need fewer Zaps.
- Free trial
- 30 days
- Annual saving
- 2 months free
- In the trial
- Full access to your plan
How I connect GoHighLevel to Zapier
This is the order I follow. It takes about five minutes the first time.
- Create a Zap. In Zapier, go to Create, then Zaps, and start a new one.
- Choose LeadConnector. Search for LeadConnector as the trigger app. Don't search for GoHighLevel, because nothing comes up under that name.
- Pick the trigger. Choose Pipeline Stage Changed. If you only want actions, start with another app's trigger and add LeadConnector as the action instead.
- Sign in. Click Sign In. A LeadConnector login window opens. Enter the email and password you use for GoHighLevel.
- Choose the sub-account. Pick the sub-account this connection is for. Each sub-account needs its own connection.
- Set the filters. Pick the pipeline and stage you care about, so the Zap doesn't fire on every stage change.
- Test it. Move a test opportunity to that stage in GoHighLevel, then pull in the test record in Zapier.
- Add the action and publish. Map the fields to the next app, run a test, and turn the Zap on.
To remove a connection later, go to Apps in Zapier, open App Connections, find LeadConnector, click the three dots and choose Delete. Any Zap using that connection stops working, so switch those Zaps to another connection first.
Sending data to Zapier with a workflow webhook
This is the method I use most, because it gets around the single trigger. Any GoHighLevel workflow can send data to any URL with its Webhook action, and that includes a Zapier Catch Hook. So the workflow trigger can be anything GoHighLevel offers, like Form Submitted, Contact Created or Appointment Status, and Zapier just receives the data.
- Create a Catch Hook in Zapier. Start a Zap with Webhooks by Zapier as the trigger, choose Catch Hook, and copy the URL. Catch Hooks need a paid Zapier plan.
- Build the workflow. In GoHighLevel, go to Automation, create a workflow and add the trigger you actually want.
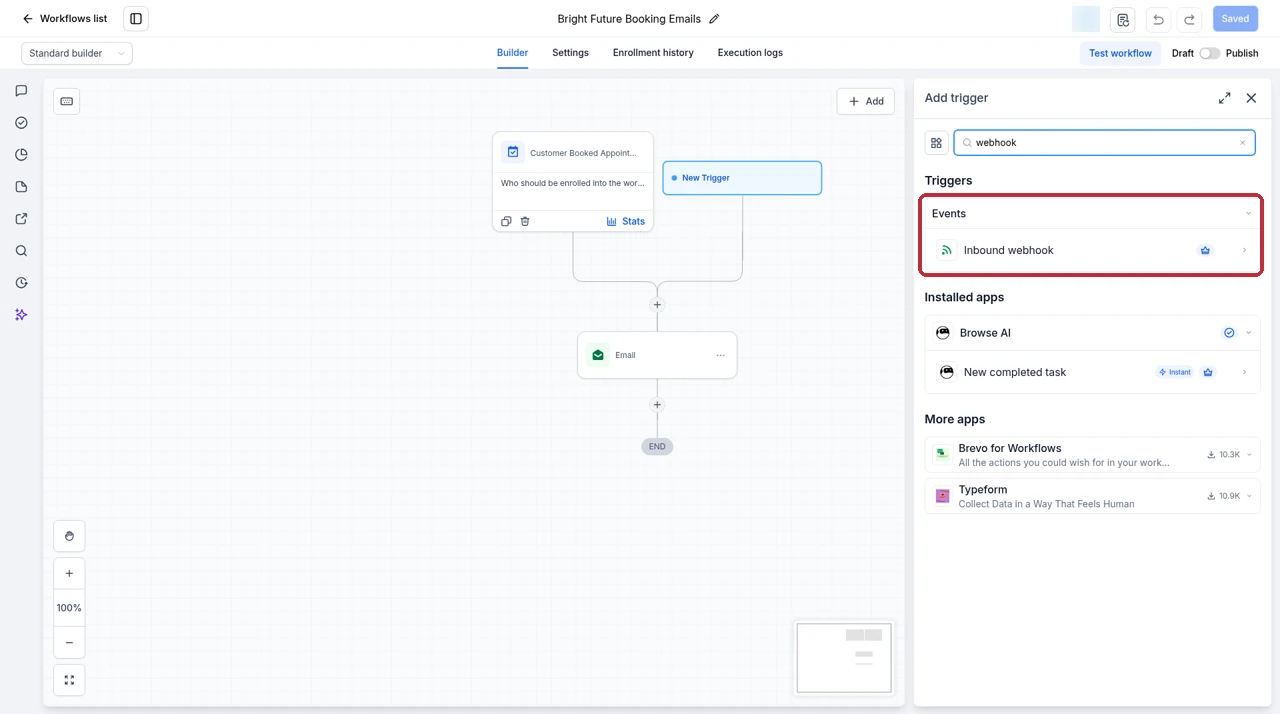
- Add the Webhook action. Add an action, search for webhook, and choose Webhook under Send data.
- Paste the URL. Paste the Catch Hook URL and add the fields you want to send, such as name, email, phone and source.
- Send a test. Trigger the workflow with a test contact, then load the sample in Zapier to see the fields.
- Finish the Zap. Add the actions you need in Zapier, test again and publish both the workflow and the Zap.
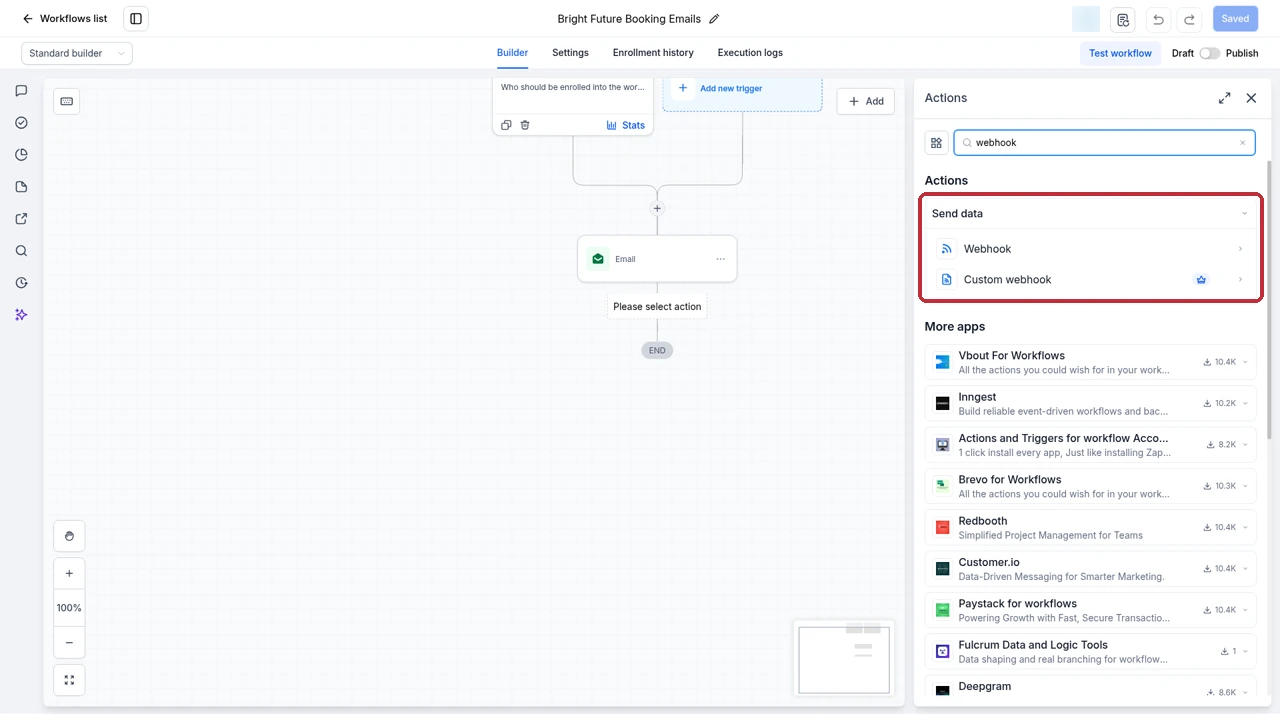
You'll see Custom webhook next to the standard one. I use the standard Webhook for Zapier, since a Catch Hook accepts whatever you send. Custom webhook is for APIs that need a specific method, headers or body format.
Receiving data from Zapier with the Inbound Webhook trigger
The other direction works too. GoHighLevel has an Inbound Webhook workflow trigger that gives you a URL. Anything that posts to it, including a Zapier webhook action, starts the workflow.
- Turn on premium triggers. The Inbound Webhook trigger needs LC Premium Triggers & Actions enabled for the sub-account. This may add usage charges, so check your billing settings first.
- Add the trigger. Create a workflow, add a trigger, search for webhook and choose Inbound Webhook. Copy the URL it gives you.
- Send a sample. In Zapier, add a Webhooks by Zapier POST action pointed at that URL and send a test with your fields. Query parameters work too.
- Select the sample. Back in GoHighLevel, load the sample request so the workflow knows the field names.
- Create or find the contact. Add a Create Contact or Find Contact action first, using the email or phone from the payload. If you skip this, the rest of the workflow breaks.
- Map the rest. Use the values under Custom Values, then Inbound Webhook Trigger, in later actions, and publish the workflow.
What Zapier costs for a GoHighLevel setup
Zapier bills by tasks. Each successful action step is one task, while triggers and Zapier's built-in tools don't count. So a Zap that adds a contact and then adds a task uses two tasks every time it runs. These are the prices on Zapier's pricing page in USD.
| Plan | Annual billing | Monthly billing | Tasks | What matters for GoHighLevel |
|---|---|---|---|---|
| Free | $0 | $0 | 100 a month | Two-step Zaps only, 15-minute checks, no webhooks |
| Professional | From $19.99 | From $29.99 | 750 a month | Webhooks, multi-step Zaps, filters and paths |
| Professional | $39 | $58.50 | 1,500 a month | Same features, more tasks |
| Professional | $49 | $73.50 | 2,000 a month | Same features, more tasks |
| Team | From $69 | From $103.50 | 2,000 a month | 25 users, 1-minute checks |
A few details are worth knowing before you choose. Annual billing is about 33% cheaper than monthly. Professional checks for new data every 2 minutes and Team every minute, while Free checks every 15. If you turn on pay-per-task, going over your limit costs 1.25 times the base task rate on annual plans and 2.5 times on monthly plans. There's also a 14-day Professional trial that doesn't ask for a card.
Remember GoHighLevel itself is a separate bill. Its plans are $97, $297 or $497 a month, or $970, $2,970 or $4,970 a year, with a 14-day free trial. My GoHighLevel pricing guide covers what each plan includes.
When you don't need Zapier
This is the part most guides skip. Before I build a Zap for a client, I check these four options, and most of the time one of them does the job with no extra bill.
Keep the automation inside GoHighLevel
If both ends of the job live in GoHighLevel, you don't need Zapier. Moving a deal when a form is filled, tagging a contact, sending a text, creating a task or notifying the team are all workflow actions. My GoHighLevel workflow templates show the recipes I build most.
Use a native or marketplace integration
GoHighLevel connects directly to a lot of common tools. Under Settings, then Integrations, you'll find options such as Google, Facebook, LinkedIn, TikTok, WhatsApp, Instagram, Google Ads, Slack, Xero, QuickBooks and Canva. The App Marketplace adds more, and those apps connect per sub-account through OAuth, an API key or basic auth.
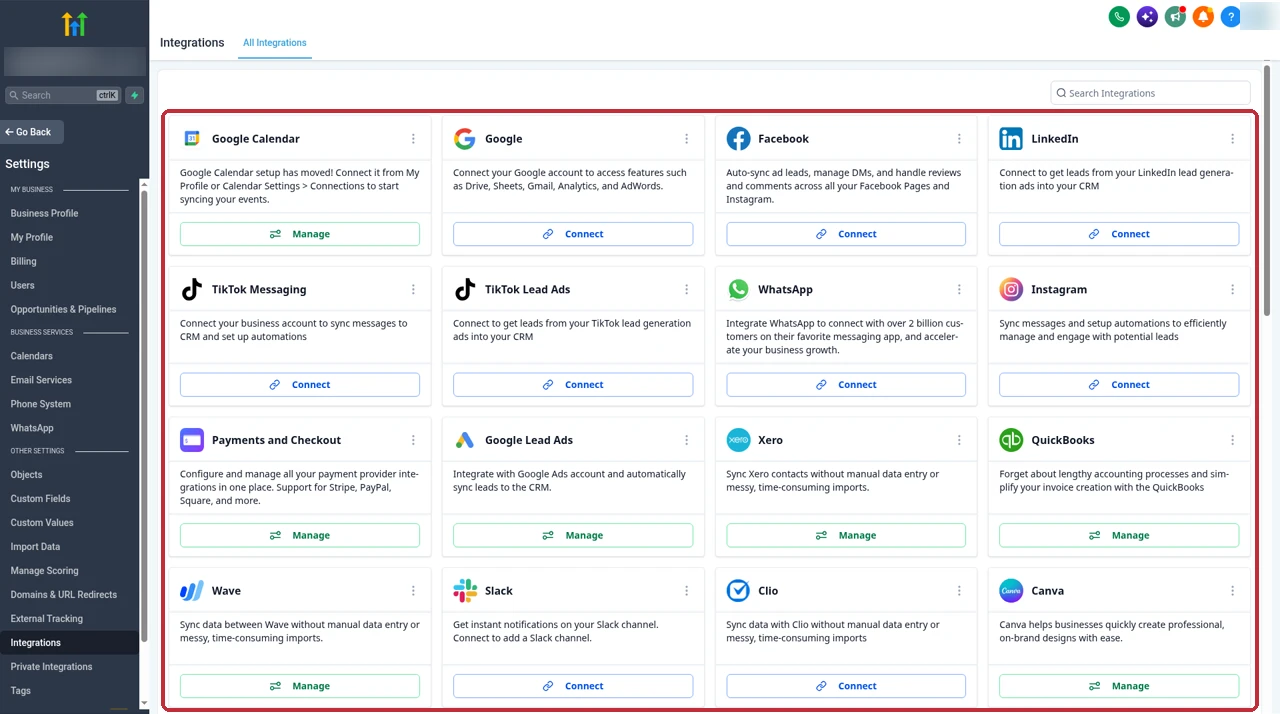
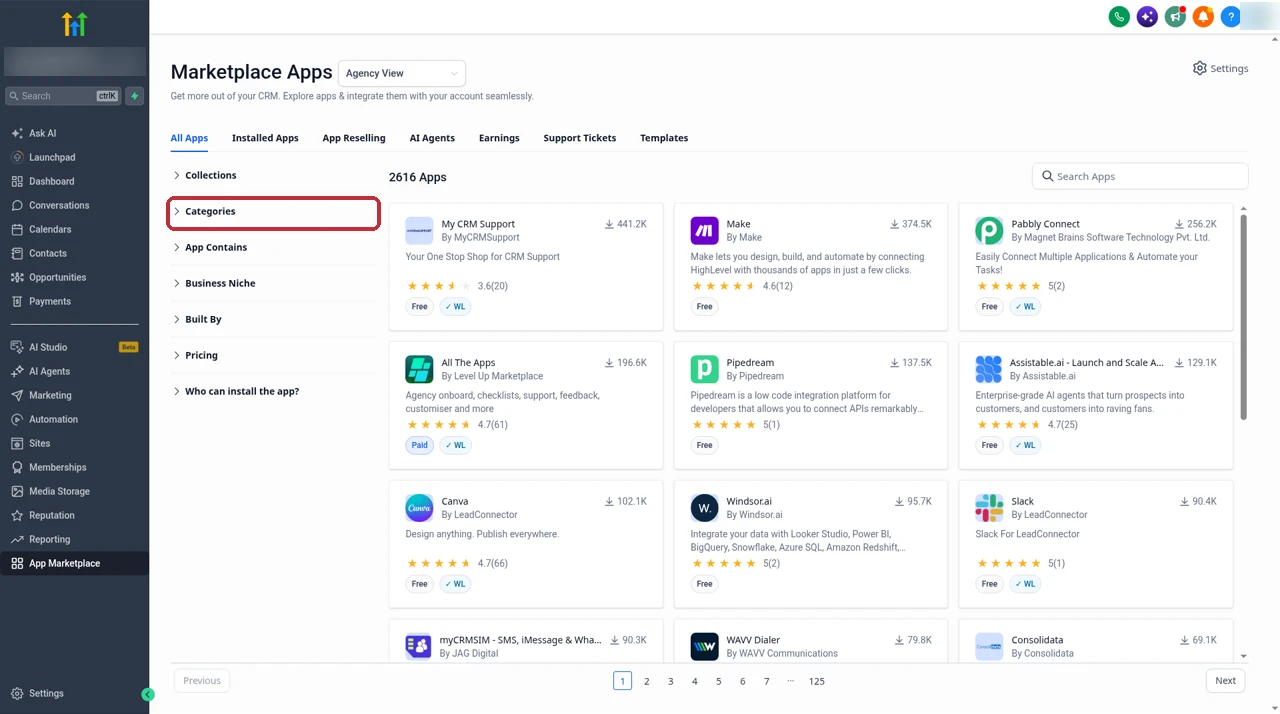
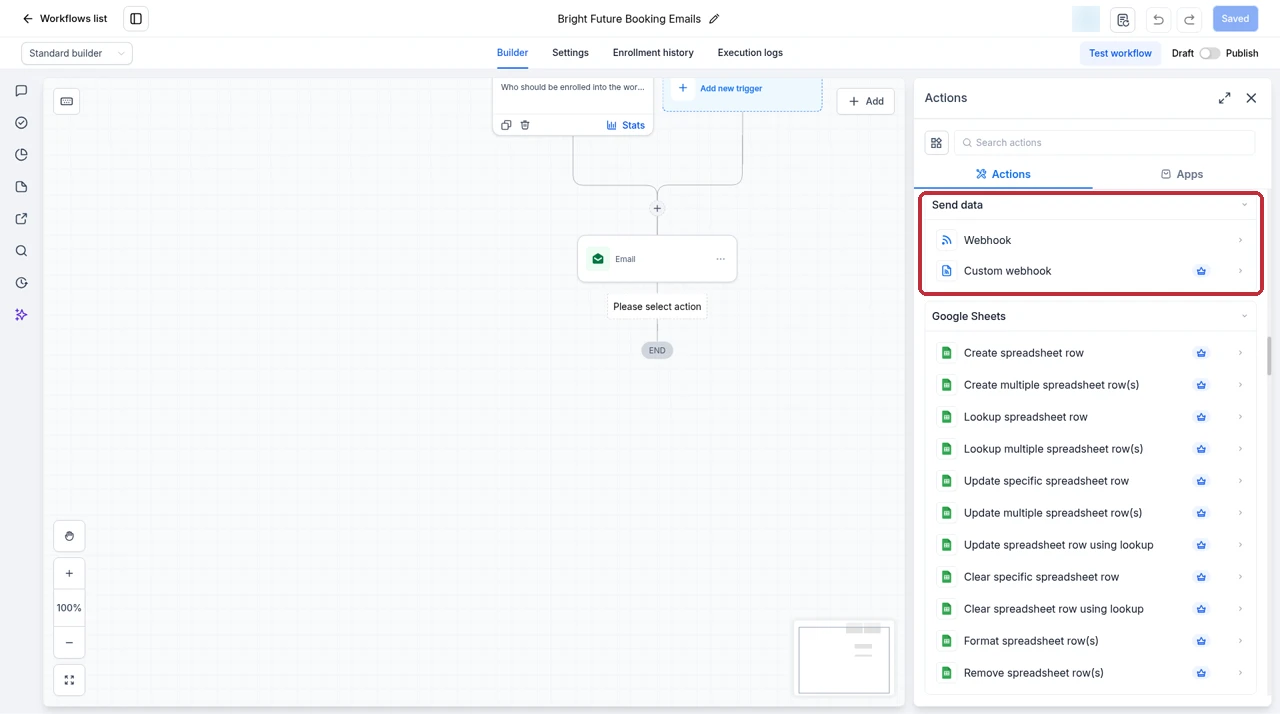
I've written up two of the native ones in detail: the GoHighLevel Gmail integration and the GoHighLevel QuickBooks integration. Also check the workflow action list for app actions, like the Google Sheets actions in the screenshot above, before reaching for Zapier.
Use webhooks directly
Plenty of tools can send or receive webhooks on their own. If the other app can post to a URL, it can hit an Inbound Webhook trigger with no Zapier in the middle. If it has an endpoint that accepts data, a workflow Webhook or Custom webhook action can call it directly. That cuts out a step and a monthly cost.
Use n8n or Make for complex logic
When the logic gets heavy, with lots of branches, loops or high volume, I usually move to n8n. It's cheaper at scale and can be self-hosted. I compare the options in GoHighLevel vs n8n. For AI-driven work, I also connect GoHighLevel to Claude through HighLevel's MCP server.
Native vs webhook vs Zapier: how I decide
| Option | Best for | Extra cost | Watch out for |
|---|---|---|---|
| Workflow or native integration | Jobs that start and end in GoHighLevel, or tools it already connects to | None beyond usage | Limited to what GoHighLevel supports |
| Direct webhook | Tools that can send or receive webhooks on their own | Inbound trigger may add usage charges | You map fields yourself |
| Zapier (LeadConnector) | Apps with no native option and simple, low-volume Zaps | Zapier plan, from $19.99 a month on annual | One trigger, task costs grow with volume |
| Workflow webhook to Zapier | Starting Zaps on events the Zapier app doesn't cover | Paid Zapier plan for Catch Hooks | Two places to debug |
| n8n or Make | Complex logic or high volume | Varies, n8n can be self-hosted | More setup time |
Common problems and how I fix them
Duplicate contacts
Duplicates usually come from sending a record without a clean email or phone number, or in a different format each time. I make sure every Zap sends a matching email or phone, formatted the same way, so Add/Update Contact can find the existing record instead of creating a new one.
Inbound webhook data isn't available in later actions
If the fields don't show up, the workflow probably doesn't have a sample request. Send a test to the webhook URL, select it in the trigger, and the values appear under Custom Values, then Inbound Webhook Trigger. And if the workflow stops right away, check that a Create Contact or Find Contact action comes first.
The Zap is updating the wrong sub-account
This one catches agencies. Each LeadConnector connection points at one sub-account, so a Zap set to the wrong connection writes data into the wrong client. I name connections after the client and check the connection on every LeadConnector step.
Old tutorials asking for an API key
Many older guides tell you to paste an API key into Zapier. That no longer applies to the LeadConnector app, which uses a login. HighLevel's older article on creating sub-accounts through Zapier also relies on the retired v1 keys. Today I'd do that with Private Integrations and API v2, or with SaaS Mode, which creates sub-accounts automatically when a client signs up.
If you're comparing GoHighLevel to other CRMs partly on integrations, my GoHighLevel vs Jobber and GoHighLevel vs Follow Up Boss comparisons cover how each one connects to outside tools.
Partner offerFree 30 day trial+ 2 months free on annual
- 30 days instead of the public 14
- Full access to the plan you choose
- Cancel any time before it ends
Common questions
Does GoHighLevel integrate with Zapier?
Yes. HighLevel's official Zapier app is called LeadConnector. It connects one GoHighLevel sub-account to Zapier, so you can start Zaps when an opportunity changes stage and push contacts, opportunities, tasks and workflow enrollments into GoHighLevel from other apps.
Why can't I find GoHighLevel in Zapier?
Because the app isn't listed under the GoHighLevel name. Search Zapier for LeadConnector, which is the white-labeled name HighLevel uses for its official integration. When you sign in, use the same email and password you use for your GoHighLevel account.
Do I need an API key to connect GoHighLevel to Zapier?
No. The LeadConnector app uses OAuth, so you sign in and pick the sub-account instead of pasting a key. Old API keys are being retired. If you call the API from your own code or another tool, use a Private Integration token instead.
What triggers and actions does the LeadConnector Zapier app have?
Zapier lists one trigger, Pipeline Stage Changed, which you can filter by pipeline and stage. It lists five actions: Add/Update Contact, Add/Update Opportunity, Add Lead to Workflow, Stop All Workflows for Lead and Add Task.
Can I use Zapier's free plan with GoHighLevel?
Zapier's free plan gives you 100 tasks a month and two-step Zaps only, with no webhooks. That rules out the webhook method and any Zap with filters or more than one action. For anything beyond a simple two-step Zap, plan on Zapier Professional, and check Zapier's own app page for any plan limits on LeadConnector.
How do I trigger a Zap when a new contact is created or a form is submitted?
The Zapier app doesn't list a new contact or form trigger. I build a GoHighLevel workflow with the trigger I want, such as Form Submitted or Contact Created, and add a Webhook action that posts the data to a Zapier Catch Hook. Catch Hooks need a paid Zapier plan.
Is the Inbound Webhook trigger included in every GoHighLevel plan?
The Inbound Webhook trigger needs LC Premium Triggers & Actions turned on for the sub-account. Premium triggers and actions may add usage charges, so check your billing settings in the account before you rely on it.
Should I use Zapier, Make or n8n with GoHighLevel?
Zapier is the quickest to set up and has the official LeadConnector app. Make and n8n are usually better value once you run lots of tasks or need complex logic, and n8n can be self-hosted. All three can talk to GoHighLevel through webhooks and the API.
The verdict
The GoHighLevel Zapier integration is easy to set up once you know to look for LeadConnector. A login replaces the old API key, every sub-account gets its own connection, and the five actions cover the most common job: getting people from another app into GoHighLevel and starting a workflow.
The single trigger is the catch. For anything beyond stage changes, I send data out with a workflow webhook, and before I build any Zap I check whether a workflow, a native integration or a direct webhook can do the job for free. Use Zapier as the bridge, keep the logic in GoHighLevel, and your task bill stays small.
Features and prices come from Zapier's LeadConnector and pricing pages, HighLevel's help center and pricing page, plus screens from our own GoHighLevel account. Both companies change their plans and features from time to time, so check their sites before you buy.
Some links on this page are partner links. How that works is explained on our affiliate disclosure page.